
Do you need to move a character sprite around to a new position? Relocate where a button is on-screen? What do pos and anchor and align and offset and all those properties mean, and how do you use them? This subset of tutorials on screen language will teach you about position properties used in Ren’Py screen language, and which one you should use in your game.
This tutorial series does not expect any prior knowledge of Ren’Py screen language or coding. I recommend you start with Getting Started with Ren’Py Screen Language if you haven’t yet read it.
Vocabulary
If you’ve seen the previous tutorial in this series, Ren’Py Screen Language Basics – Basic Containers, these terms will be familiar. If you’re coming here to learn more about positioning sprites, you can read on. If you’re looking to learn more about screen language in general, consider starting with Getting Started with Ren’Py Screen Language.
I’m going to be using two main words to refer to moving things around: elements and containers.
An element is anything you’re moving around on the screen. It might be a button, a character sprite, an image, text, or a collection of any of those.
A container is the space inside which you’re positioning the element. For a character sprite, the container is generally the entire screen. You can also manually specify various containers to group elements together – in the default Ren’Py UI, for example, the Start/Load/Preferences/Quit etc buttons are grouped into a container called a vbox (short for vertical box) so the buttons are stacked on top of each other from top to bottom. An element’s position is always relative both to the size of the element itself as well as its container (see Ren’Py Screen Language Basics – Basic Containers for more on that!).
What are position properties?
These are properties of screen language elements which move them around. Need a button in the middle of the screen? Need to move your sprite to a custom position? These are the properties you’ll use to move it there.
A “property” as it relates to screen language simply refers to information about the element that tells it how to look or how to behave. You can read more about it here.
Floats vs Integers
The most important thing to remember about position properties in Ren’Py is that they all treat floats and integers differently (see Simple Variable Types in Ren’Py if you aren’t sure what floats and integers are – in short, floats = decimal points, integers = whole numbers).
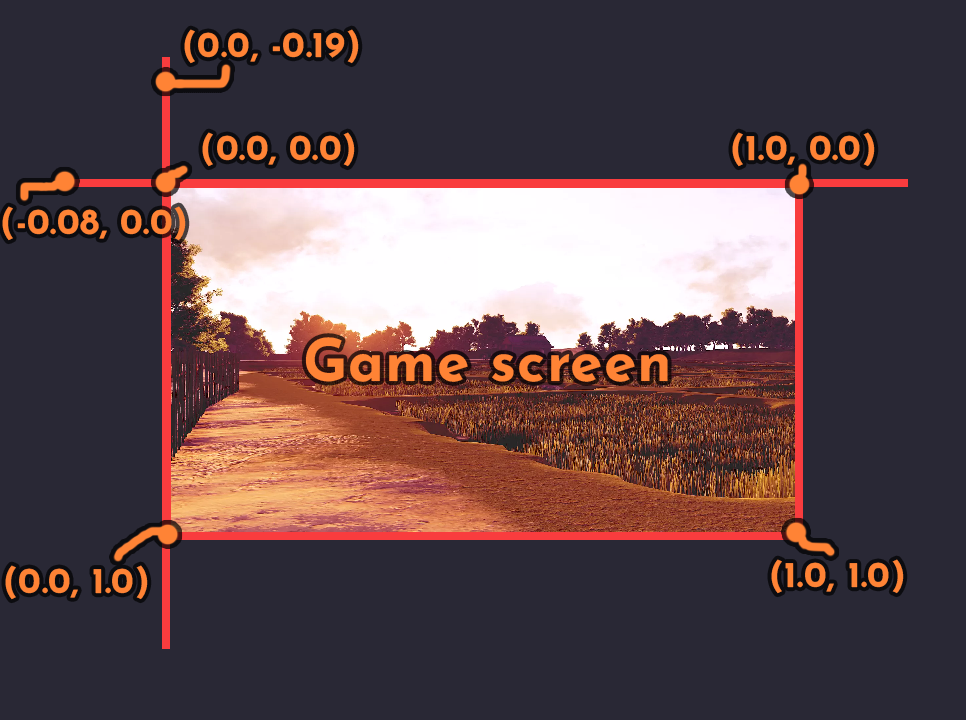
If a number has a decimal point in it anywhere (aka it is a float), it is treated as a percentage of its container (or, if it isn’t explicitly in a container, a percentage of the screen size). So 0.5 is treated like 50%.
Conversely, if it is an integer, it is treated as an exact pixel value. There is a special method you have to use if you want to use fractions of pixels as exact positions – otherwise, as soon as you add a decimal point, you’re dealing with percentages relative to the size of the container and/or the size of the element you’re moving.
Note: If you would like to position an element at an exact percent of a pixel, you can do so with absolute(10.5) where 10.5 is the pixel position. This is exceedingly uncommon and is mostly mentioned as a point of interest. It will not be touched on in this tutorial.
Starting Position
Before we get into the different positioning properties, know that Ren’Py considers the default for all position properties to be (0, 0), which corresponds to the top-left of the element you’re positioning. Coordinates come in (x, y) pairs. So, the position (0, 0) is the top-left corner of the screen if you’re positioning an element without a container.
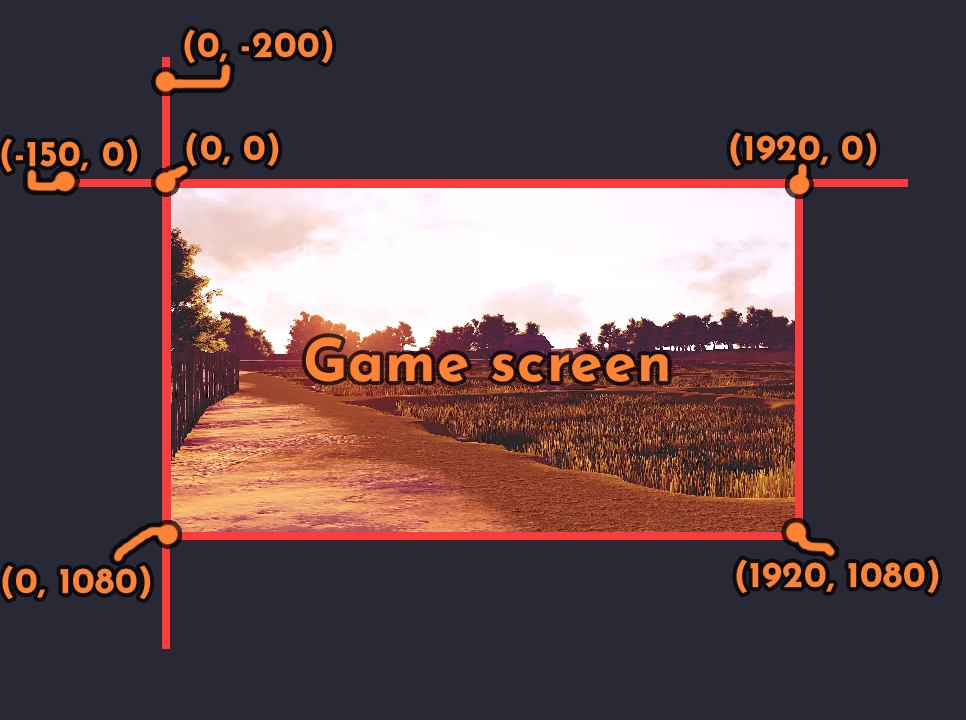
Positive numbers will move the element to the right and down. So, something at a position of (200, 300) in the game will be 200 pixels from the left edge of the screen and 300 pixels from the top edge of the screen. Similarly, negative numbers move the element left and up relative to their starting position.
Position and Anchor
Position and anchor will make up the bulk of what you use to move elements around on the screen. It’s very important to understand how they work, because most of the other positioning properties act as some combination of these two properties.
Pos
First up is pos. Pos is short for position. It comes in two main flavours: xpos, for moving things left-to-right (along the x-axis), and ypos, for moving things top-to-bottom (along the y-axis). There is also a property that lets you set both xpos and ypos at the same time: pos. If you are using pos, you have to provide two numbers, separated by a comma. The first number is the xpos and the second is the ypos e.g. pos (200, 300) which positions the top-left corner of the image 200 pixels from the left and 300 pixels down from the top. pos (200, 300) is equivalent to xpos 200 ypos 300.
By default, the starting position for a screen element is the top-left corner of its container.
Anchor
Next is anchor. It also comes in two main varieties: xanchor, which moves the anchor on the x-axis (left-to-right), and yanchor which moves the anchor on the y-axis (top-to-bottom). anchor lets you set both at the same time, much like pos e.g. anchor (0, 0).
By default, the anchor for a screen element is its top-left corner (0, 0).
Understanding pos and anchor
While position seems pretty intuitive to understand – it’s just the position where the element is – what, exactly, is anchor?
Let’s think of it in terms of something you may be more familiar with. Instead of positioning an element on a screen, you are trying to pin a photo onto a cork board. You have three things: a cork board, a push pin, and a photograph. Let’s pretend that 1mm is equal to 1 pixel on a computer screen.
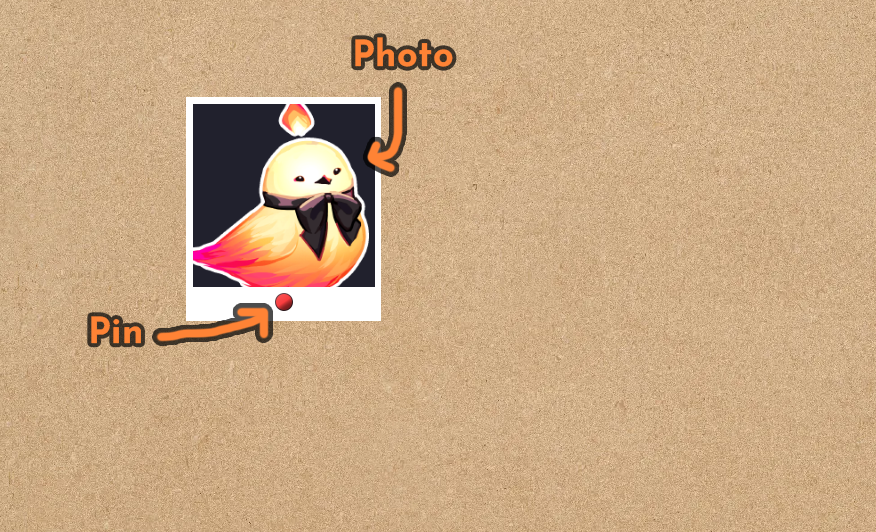
- The cork board is the screen, or the container you’re trying to position the element inside.
- The photograph is the element.
- Where you put the pin on the photo is the anchor of the photograph.
- Where you push the pin into on the cork board is the pos of the photograph.
By default in Ren’Py, the push pin always starts in the top left corner of the photo, so to speak. If you want the top-left corner of the photo 200mm from the left side of the cork board, you will put it at xpos 200. If you also want the top-left corner 300mm down from the top of the board, you will put it at ypos 300.

What if you want the center of the photo at 200mm x 300mm?
This means you need to move where the pin is relative to the photo. The pin will stay at the point (200, 300) on the cork board – you just need to center the photo around that point as well. This means you need to change the anchor of the photo.
Except in some rare cases, an anchor point is usually one of three values: 0.0, 0.5, or 1.0. Note that 1.0 is very different from 1 for positioning properties – see Floats vs Integers. This is because usually you want to position elements relative to one of their edges, or relative to the center.
To set the anchor point of the photo to the center of the photo, you can use anchor (0.5, 0.5) (aka xanchor 0.5 yanchor 0.5). Remember that floats mean percentages, so 0.5 means that the anchor is 50% of the way across the photo and 50% of the way down the photo, putting it at the exact center.

Thus, a more concrete screen language example of positioning the center of the photo at position (200, 300):
screen cork_board():
add "photo":
pos (200, 300)
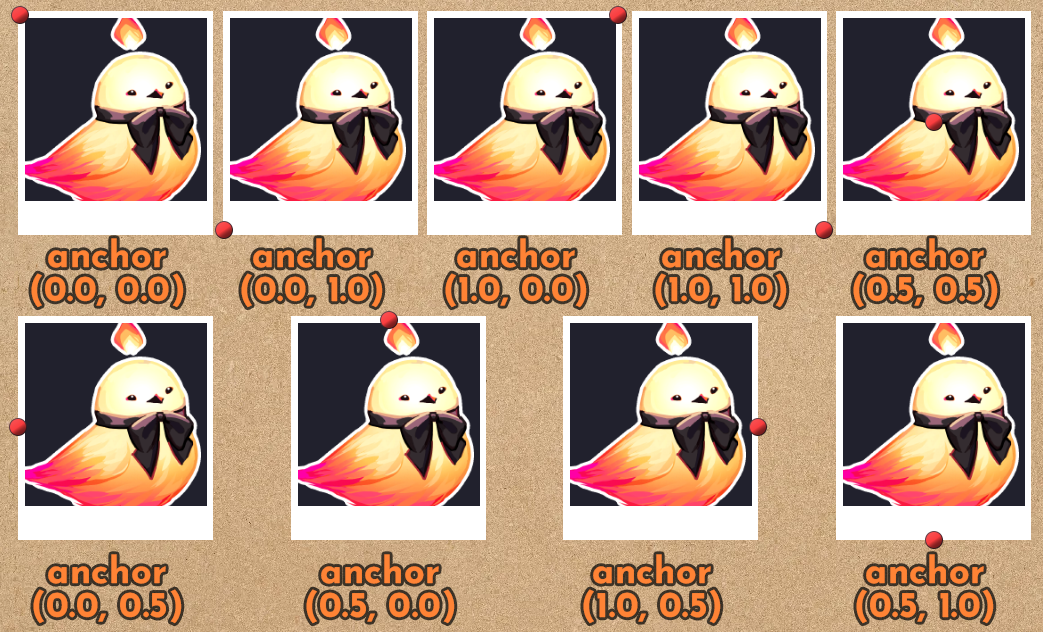
anchor (0.5, 0.5)As mentioned, anchor points are usually 0.0, 0.5, or 1.0. With this in mind, here are the most common anchor properties and where they correspond to on the element. Remember that the red circle “pin” is the anchor point on the photo.

anchor (0.0, 0.0) # Top left corner
anchor (0.0, 1.0) # Bottom left corner
anchor (1.0, 0.0) # Top right corner
anchor (1.0, 1.0) # Bottom right corner
anchor (0.5, 0.5) # Exact center

anchor (0.0, 0.5) # Middle of the left edge
anchor (0.5, 0.0) # Middle of the top edge
anchor (1.0, 0.5) # Middle of the right edge
anchor (0.5, 1.0) # Middle of the bottom edge
Pos with floats
Unlike anchor, in which it’s very rare to use integer values to specify an anchor point (since it would be an exact pixel position, and it’s rare to need an anchor point somewhere in the nebulous middle of an image rather than at its exact center or along the edges), pos commonly uses both float and integer values. As mentioned, something like pos (450, 100) will put the anchor point of the image 450 pixels to the left of its starting position and 100 pixels down.
However, you can also use floats with pos to specify a position as a percentage of the size of the container it’s in. While it’s much more common to use 0.0, 0.5, and 1.0 than other values, it’s not uncommon to see values like 0.25 or 0.75, for example, particularly in combination with an anchor point of 0.5 so you can do things like position the center of the image 25% of the way across the screen (aka xanchor 0.5 xpos 0.25).
Tip: If you find yourself using more than two decimal points for a positional property (anchor, pos, align, offset, etc), you should probably be using an exact pixel value instead. So, xpos 0.3452 is probably better expressed as something like xpos 663 (exact value will depend on the size of the container/size of the screen). It’s much, much easier to add 1 or 2 to an integer position rather than adding on several extra decimal places to try to nudge an image over a couple pixels.
Common pos and anchor combinations
Some common combinations for various positions include:
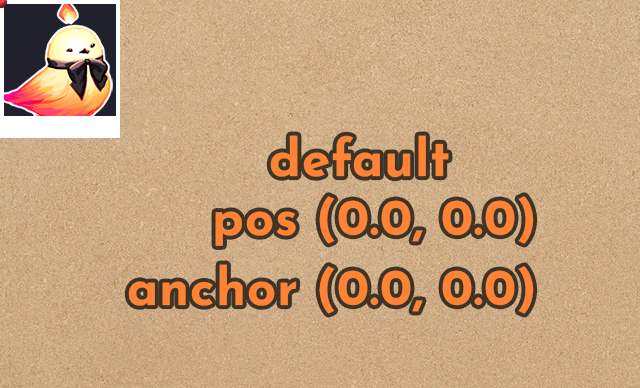
# Top left corner (aka the default position)
pos (0.0, 0.0) anchor (0.0, 0.0)
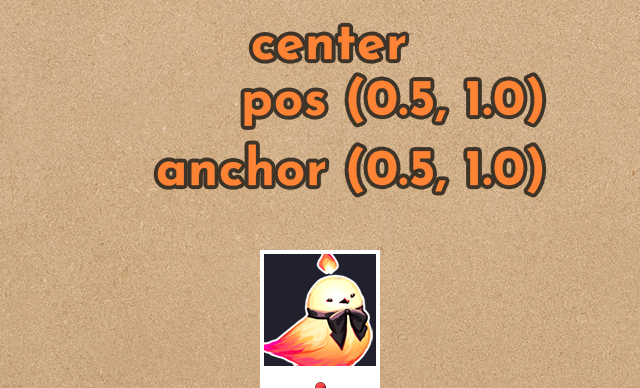
# Bottom edge of the element against the bottom of the container, centered
# (aka the default `center` position of character sprites)
pos (0.5, 1.0) anchor (0.5, 1.0)
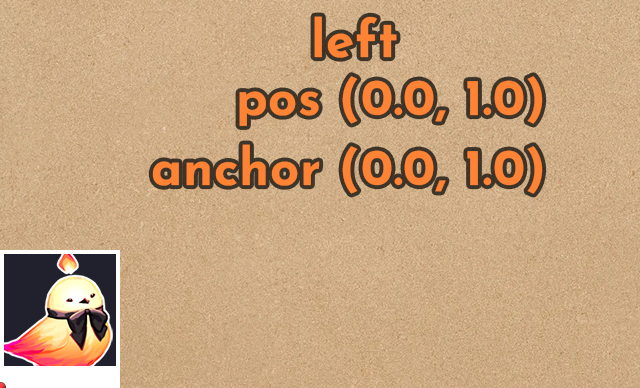
# Left edge of the element against the left edge of the container,
# bottom edge of the element against the bottom of the container
# (aka the position `left` as in `show eileen at left`)
pos (0.0, 1.0) anchor (0.0, 1.0)
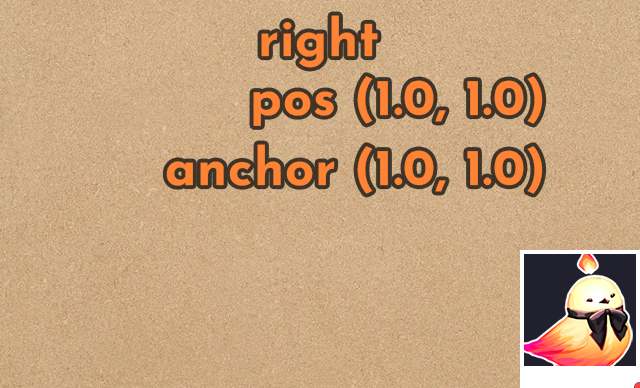
# Right edge of the element against the right edge of the container,
# bottom edge of the element against the bottom of the container
# (aka the position `right` as in `show eileen at right)
pos (1.0, 1.0) anchor (1.0, 1.0)
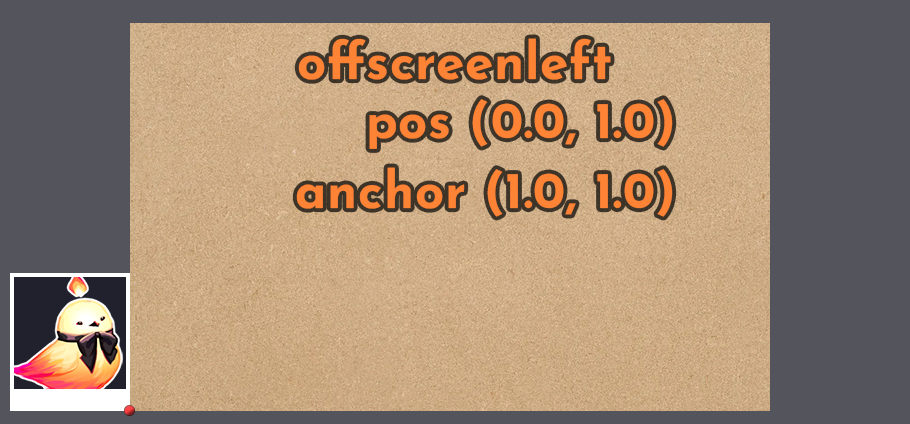
# Just offscreen to the left, where the right edge of the image is against
# the left edge of the container so it's just offscreen, aligned to the bottom
# (aka the position offscreenleft)
pos (0.0, 1.0) anchor (1.0, 1.0)
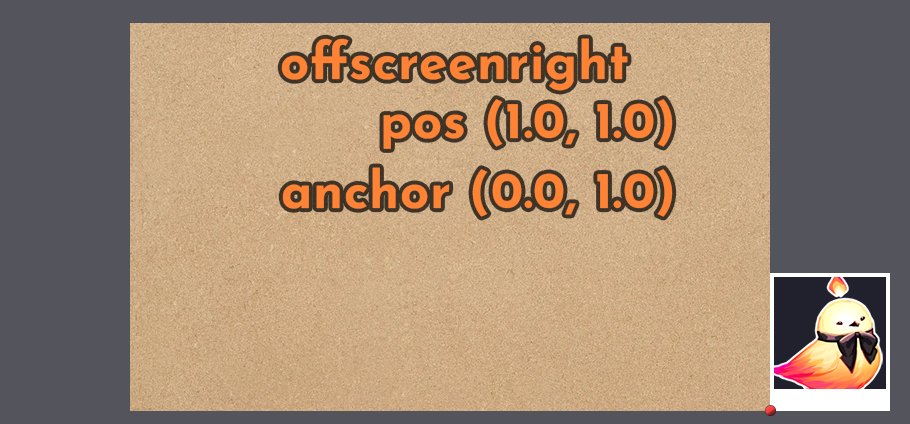
# Just offscreen to the right, where the left edge of the image is against
# the right edge of the container so it's just offscreen, aligned to the bottom
# (aka the position offscreenright)
pos (1.0, 1.0) anchor (0.0, 1.0)
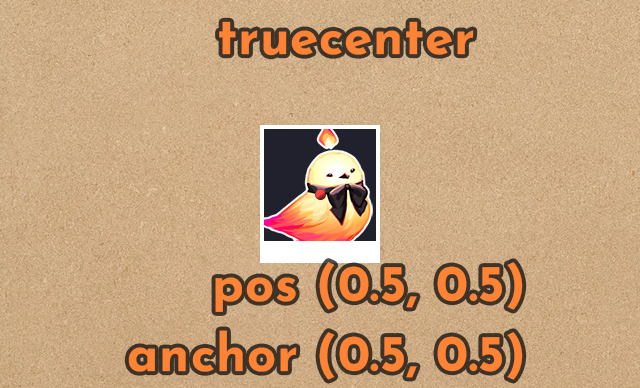
# Precisely centered (aka the position truecenter)
pos (0.5, 0.5) anchor (0.5, 0.5)Summary
And that covers the basics! pos and anchor will let you position an element just about anywhere you need it; they’re the fundamentals that make up the rest of the position properties you’ll see in part 2 aside from offset. pos is much more common than anchor; aside from centering elements or aligning them to the edges, you’ll generally use anchor a lot less than pos.
Next Steps
In the next part in the series we’ll go over the remaining position properties align, xycenter, and offset: Ren’Py Position Properties – align, xycenter, and offset. As per usual, check out my itch.io for tool releases also!
Does this work for choice buttons? I’m trying to reposition them to just above the right of the dialogue box and it’s only moving the text.
Yes, position properties work for all elements displayed on screens! As you’ve discovered though, you need to apply it to the right thing – in particular, the default choice screen is set up with buttons inside a vbox container. To move all the buttons at once, you need to use position properties on the vbox. A helpful way to find where the code you need to edit is is to hover over the element you want to change (like a choice button) and hit shift+i in-game. This will bring up the style inspector, which has a bunch of links and information on the styles and properties applied to that element. You’ll want to look out for the choice_vbox in particular. Hope that helps!
Hey there,
Just wanted to let you know that this series is amazing, this is *by far* the most helpful set of guides I’ve found for learning RenPy, bar none.
I’m just getting into GameDev with prior coding experience but no experience using RenPy and I’ve started to think about how to set up a navigational system with a map, and I realized I needed to get a handle on screen language on the RenPy side. I found a few youtube tutorials but what they showed wasn’t in-depth enough for what I wanted to do, and this series is exactly what I was looking for. Looking forward to the entry on buttons as I imagine that will be very relevant. Keep up the great work, can’t wait to read more!
Thank you so much for your comment! I’m really glad you’ve found the tutorials helpful ✨ I hope to have the button tutorials out soon. Best of luck with your navigation system as well!
Oh my goodness, amazing lesson and well explained!
I’m having the issue that my image can’t be manipulated at all. I’ve been trying things like:
at right
at truecenter
and I keep getting an error line like, “end of line expected” and it singles out the “at _” of anything I try to add. The image is not the size of my screen (I opted for a smaller resolution (1280 x 720)), and my image is 256×256. I don’t know what I’m doing wrong because the image shows on screen, it does the dissolve transition, but anytime I try to move it from the bottom, I get an error :((( I’m so new to this that I can’t find anything that helps.
I’m glad you’ve found it helpful!
As for your error, it depends a lot on where that code is, and if you’ve got anything else on that line (or a newline). For script in labels, it usually looks like:
show eileen at rightand you’ll need to make sure any transitions (e.g. “with dissolve”) come at the end, after the “at” code.
For things in screens, it instead looks like
add "your_image.png" at truecenterI hope that helps!
Hey Cheers in a big way for this. I am not a Renpy Developer but i do have programming knowledge like C and VB. I don’t use a mouse only a keyboard and i play so many games where there is like a map of image buttons and they don’t highlight with a keyboard and i end up (if i like the game) customising the code to make a keyboard friendly version. Drives me crazy. I wish more developers would take time to learn with code before they run.