
As some of you may already know, I recently gave a talk last month in the 2024 Visual;Conference. You can find it below on YouTube!
I’ve also included my notes and the code excerpts from my code in this article below. Enjoy!
Introduction
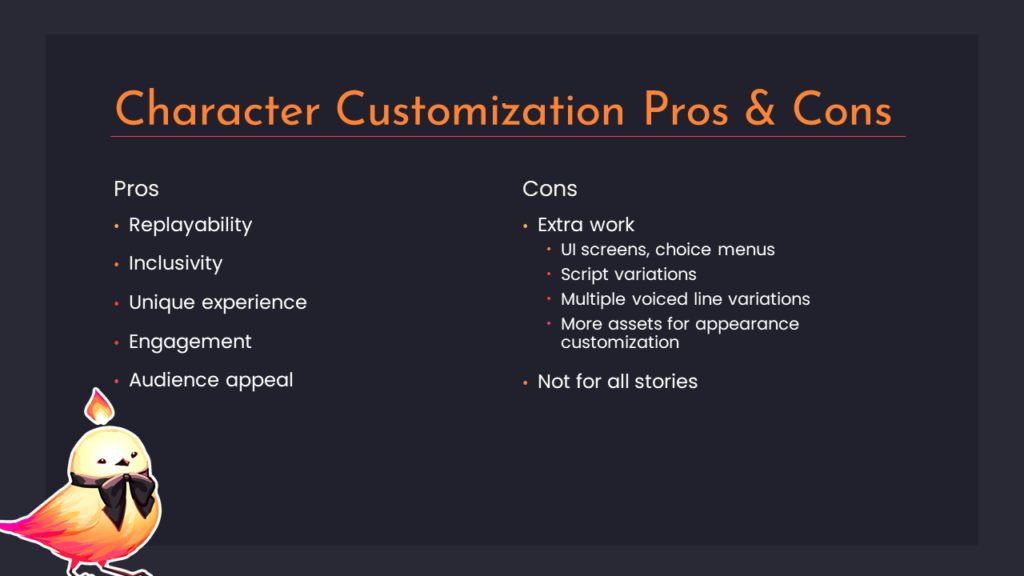
Let’s look at some of the pros and cons to character customization so you can decide whether it’s right for your story.
- Replayability – Character customization can vastly improve replayability. Adding variations according to the aspects the player customized, whether that be their background, personality, gender, or appearance, provides an incentive to return to the same story to explore the lore, characters, narrative, and more.
- Inclusivity – Character customization may also provide players with an avenue to express themselves, especially if they like to imagine themselves as part of the story. Allowing players to create a character who resembles them or who acts like they would can be very meaningful, especially when mainstream representation can be a rarity.
- Unique experience – Have you ever watched someone play a game and thought, I wouldn’t have made that choice. I wouldn’t have said that. I liked the first hairstyle better than the one they picked. This can be a major motivator for a player to want to play a game themselves after learning about it. Character customization can be a primary source of this appeal.
- Engagement – Customizable main characters are an excellent avenue for audience engagement. Since facts about the character are not set in stone, players are free to invent additional details to fill in the gaps. Many players will create their own original characters to roleplay as in the story and will create fanworks featuring them. More fanworks about your game expands its reach and can bring more people in to check it out, especially due to the previous point about customization offering unique experiences for each player.
- Audience appeal – Finally, including a customizable main character can open up your game to new audiences. Players often want to play games with main characters similar to themselves – customization means a much wider range of people can do so.
However, there are also drawbacks to including character customization.
- Extra work – For one, it’s additional work no matter which way you slice it. It’s work to include UI screens and choice menus for choosing pronouns, personality traits, appearance traits, and other information, and it’s work to write additional script variations to take the player’s customization choices into account.
- If you’re including voiceover with a player with custom traits, it could require multiple takes on similar lines to account for different pronouns, backgrounds, appearances, and more.
- If the main character’s appearance is customizable, it’ll involve more assets (or at minimum more involved asset creation) than if they had a set appearance, or you may make other sacrifices such as minimizing the main character’s appearance in CG art.
We’ll go over these drawbacks and what sorts of things you can do to mitigate them later on.
The second major reason to not include character customization is that it just isn’t for all stories. Character customization typically works best for stories with an obvious point of view character whom the player has some control over via choices or other gameplay mechanics. If the cast is more of an ensemble, the narrative is linear, or the main character has a plot-essential backstory and pre-determined personality, character customization may not be right for your story.
Pronouns
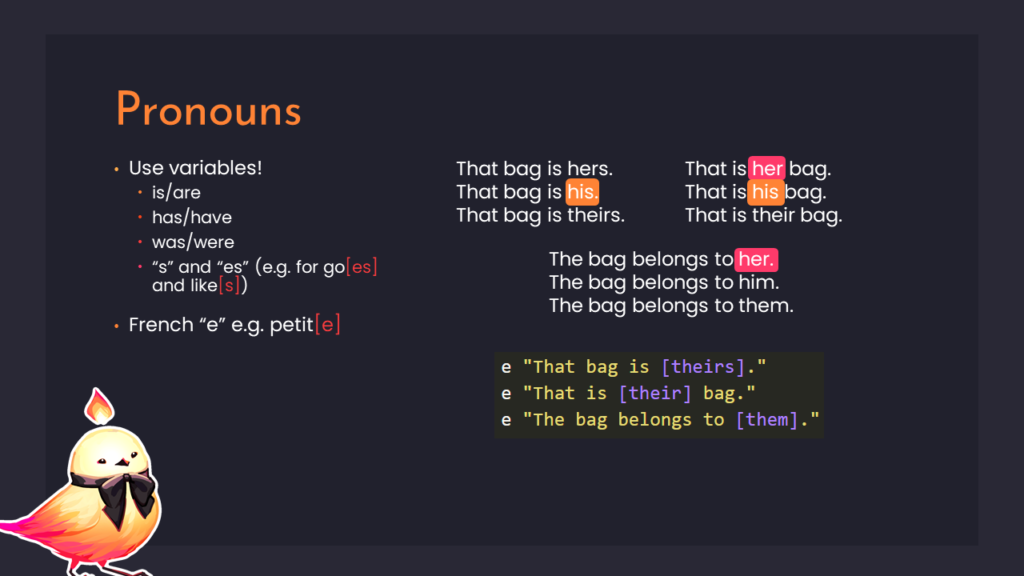
First, we’ll start with pronouns. Pronouns are one of the simplest ways to add character customization to a game without adding a ton of work for yourself.
First and foremost: use variables! Please don’t include a bunch of conditional statements like if pronouns == "she/her": etc. In many engines this will mean each line counts as a different one when skipping only previously seen text, so players will be halted all over the place when replaying if they choose different pronouns, which is a poor experience. Variables will keep your script readable and make your repeat players happy.
These next tips will focus primarily on English pronouns and conjugations, but the idea can be applied to other languages as well.
I highly suggest you set up the variables to be named they/them/their/theirs/themselves, since unlike he/him and she/her, all they/them pronouns have unique forms. This also results in very readable code, since for the most part it simply reads like a regular sentence.
You will also need to set up verbs as variables, since pronouns like they/them conjugate differently from most other pronouns. I suggest variables for is/are, has/have, was/were, and then special “s” and “es” variables that will take care of the majority of regular verb conjugations.
This can be extended to other languages; for example, you may declare variables for changing adjectives and verbs into their feminine forms in French.
class Pronoun():
    def __init__(self, neutral, masculine, feminine):
        self.neutral = neutral
        self.masculine = masculine
        self.feminine = feminine
    def __str__(self):
        global pronouns
        if pronouns == "she/her":
            return self.feminine
        elif pronouns == "he/him":
            return self.masculine
        elif pronouns == "they/them":
            return self.neutral
        else:
            return self.neutral
define they = Pronoun("they", "he", "she")e "I think [they] left already."In some engines, there will be a way to directly evaluate a value in dialogue at the time it is shown, rather than needing to declare a variable with a set value beforehand. In Ren’Py, we can use a class’s special string method (__str__) to achieve this. Without this, you would need to update perhaps dozens of variables when the player changes their pronouns, but with this, pronouns and related terms become a special kind of constant. It gets evaluated at runtime instead of when it’s declared, and in this example, it returns the right word based on one variable called “pronouns”. The on-screen example accounts for three different pronoun sets.
You might notice this logic is very similar to the earlier conditions that I mentioned were bad – the difference is when the logic happens. In a string method, it happens right when the value is shown in dialogue, and not when you declare it. This means you can easily update the player’s pronouns by switching just one variable, and all associated words and terms and verbs will simply work. You can even let the player update their pronouns in the middle of the game, or randomize which pronouns are used on every line, which allows for enormous flexibility on the player’s side with zero additional effort on your end.
define attractive = Pronoun("attractive", "handsome", "beautiful")e "You're very [attractive]."You can use this approach for words you might want to change based on the player’s pronouns also, with very few changes. This will allow you to declare honorifics, adjectives, terms of endearment, and more which are based around the player’s pronouns.
Where possible, consider also allowing the player to choose terms for themselves independently of which pronouns they choose. You can extend the class approach to facilitate this; I recommend giving each term an ID and storing the player’s preferences in a dictionary with the ID as the key. You can then use the class’s string method to search for the correct word in the dictionary, with the default term as a fallback.
If this all seems confusing, you’re in luck! I did the heavy lifting for Ren’Py users and made all this backend stuff already, which you can find for free on my itch.io. It includes the approach described here, with additional flexibility to allow players to enter their own pronouns and input custom terms. Once the backend is all set up, writing dialogue for a player whose pronouns and terms change every line looks identical to a player who only uses one set of pronouns.
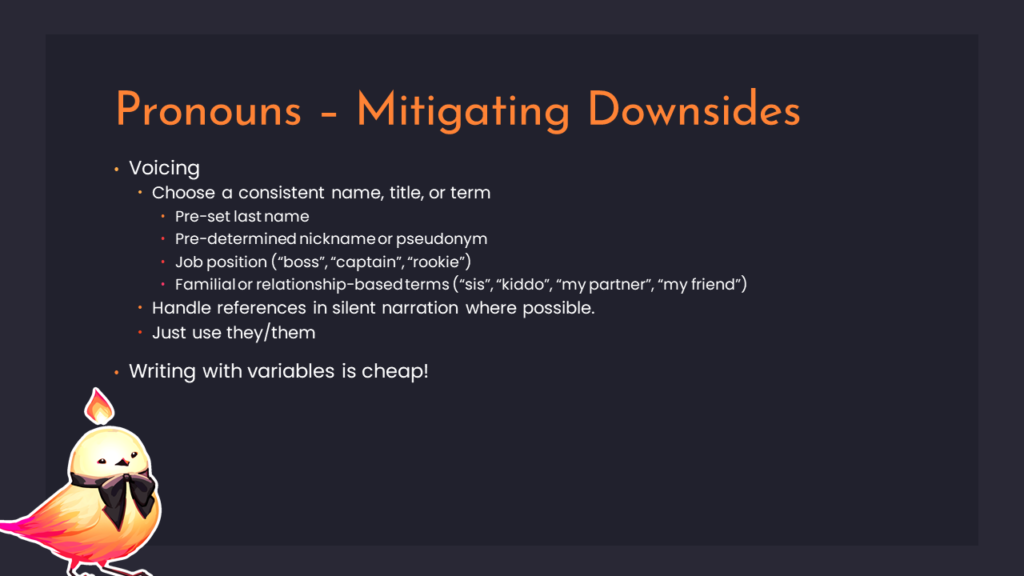
Now as with any feature, there are some potential pitfalls with allowing the player to choose their pronouns and terms. One of these is voice acting. If you’re including full voice-acting in your game, at some point you are going to want to refer to the player character in the third person without recording dozens of variations.
There are some solutions to this. If you allow the player to change the main character’s name, consider keeping a consistent surname or nickname that the other characters can use to refer to them aloud. You can also use their job position or position of power to refer to them, or use relationship-based terms for characters close to the main character.
Some languages may have other natural-sounding ways around this also, such as the plethora of Japanese terms for referring to people older than you or in a position of authority. Or, if your game is not set on Earth, consider inventing gender-neutral ways of referring to the main character.
If your narration is unvoiced, you can clarify the topic of conversation in a line of narration, where you can substitute in variables, rather than in voiced dialogue. You might also assign some other character the point-of-view so their internal thoughts do not need to be voiced.
If you absolutely must use pronouns to refer to the player, I suggest just recording the line once using they/them.
Other than that, using variables in unvoiced dialogue is trivial! Create enough variables to write your script comfortably (maybe even using my tool), and you should be fine.
Appearance
Next, you can also offer character customization in the form of appearance. Allowing the player to change the appearance of the main character can take several forms. Let’s first go over a couple of common variants.
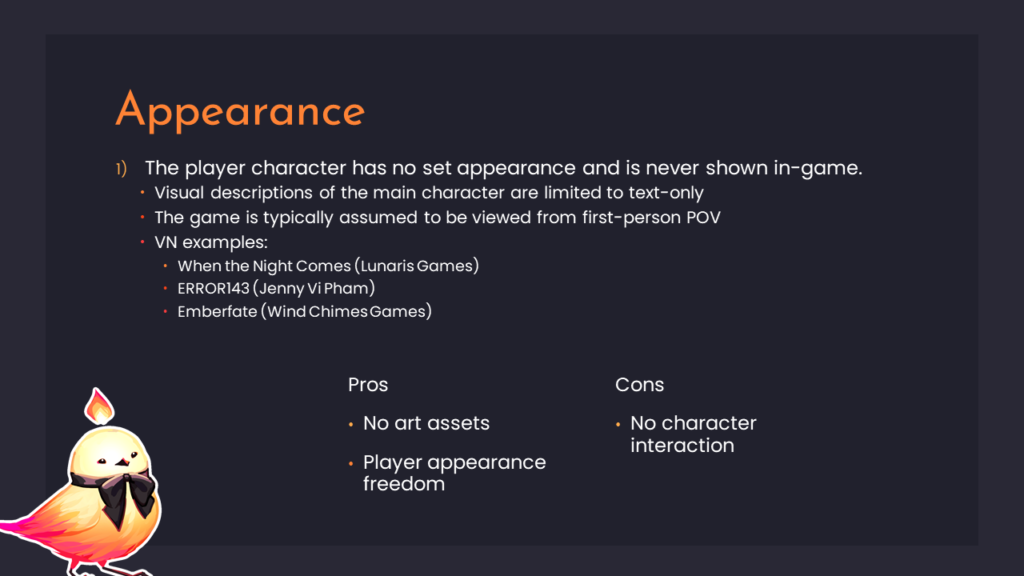
First off is text-only appearance customization. The main character has no set appearance, and they are never shown in-game. If the game has CGs, they are focused around other characters. On the upside, this approach does not require any additional art assets, and it allows for complete player freedom in deciding what the main character looks like. On the downside, the main character can’t be shown interacting with the other characters in CG art. This is most notable for games which involve romance, where interacting with the love interests is often a key part of CG art.

Next, a customizable character might only have some small part of them shown in-game. This is most often the main character’s hands, but is sometimes the back of their head, over their shoulder, an extreme closeup of their eyes, etc. Usually the game is still assumed to be from first-person perspective.
This approach allows for some limited interaction between the main character and other characters, but still leaves most of the details of their appearance up to the player’s imagination. Depending on which part of the main character you choose to show, you may need additional art assets to reflect the appearance the player has chosen for the main character, such as colour variations or different body types.
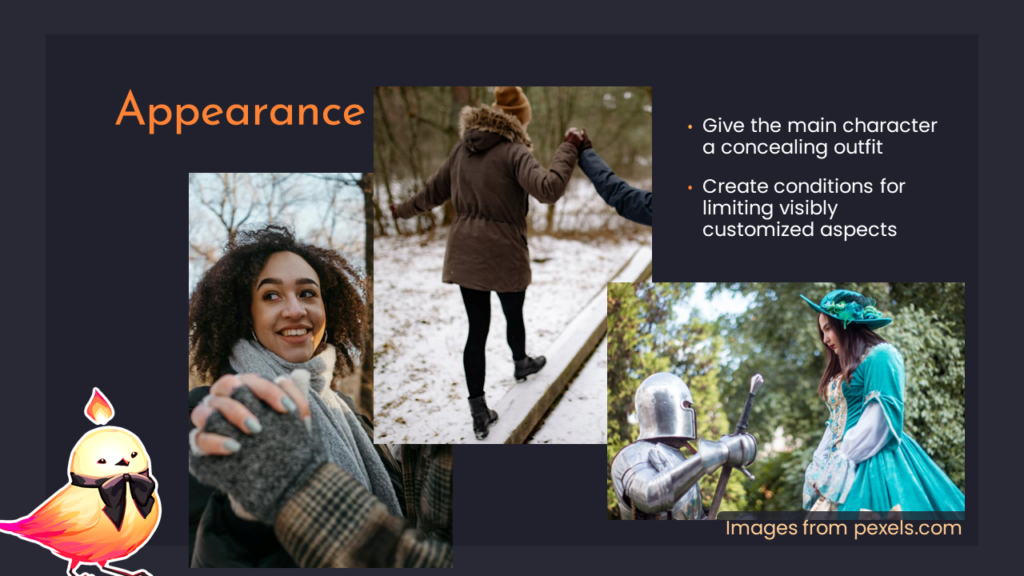
Some clever approaches to this kind of customization involve arranging for conditions which put sensible limits on the player’s appearance. For example, you may make your main character a knight, in which case, whenever they are shown you can show them in a suit of armour. You might show the main character’s hand cupping a love interest’s face while wearing gloves because they are outside during the winter to avoid needing skin colour or hand size variations.
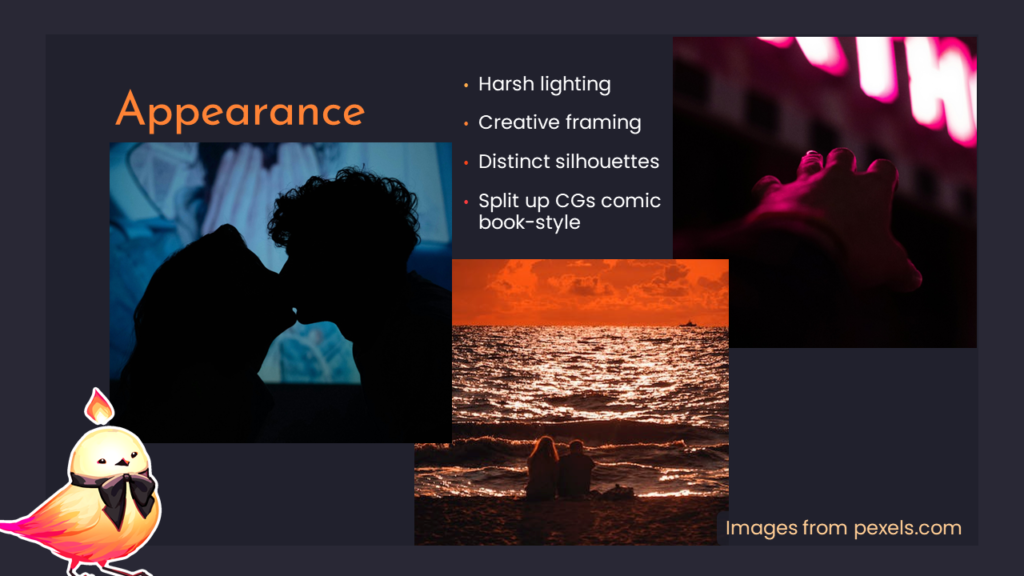
Use harsh lighting or framing to avoid showing too much detail. Write your story so the main character is wearing a specific outfit or hat so their silhouette is distinct but leaves the details up to the player. Consider also splitting up CGs comic-book style with closeups on some key areas, such as hands, to show interaction, but keep the main focus of the art on the other characters.

Third, the main character may have one or more pre-set appearances. If there is more than one pre-set appearance, it’s often connected to choosing a gender. I suggest not tying appearance to gender or pronouns, like you see for Royal Order in the top right; divorcing these associations adds a trivial amount of work (perhaps having three variables to track appearance, gender, and pronouns separately) and gives the player more ways to customize their experience.
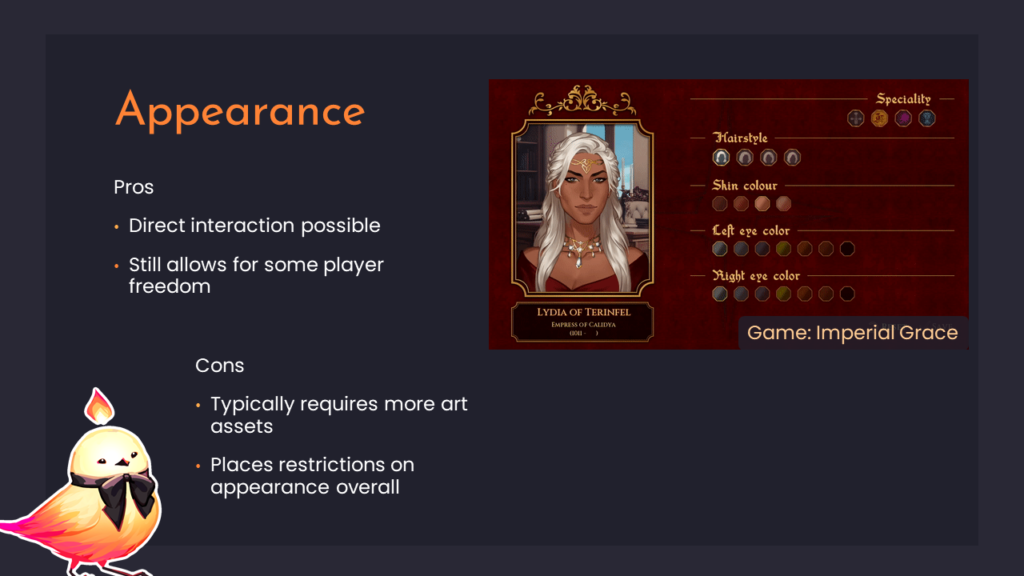
Of the upsides, this approach allows the most interaction between the main character and other characters since they have a fully pre-determined appearance which can be shown in-game as a sprite or in CGs. Offering some colour or body type options still allows for some level of player control over the main character’s appearance.
However, this approach requires more assets if you would like to take advantage of showing the main character in-game, as you’ll need to account for all the customization options. It also places several restrictions on the main character’s appearance, resulting in something more akin to variants on the same character rather granting each player the ability to create unique characters.
One way to mitigate the amount of work this requires is through colorizing images in-engine. If your engine of choice supports shaders, such as Ren’Py or Unity, you can apply them to the same art asset to recolour it in several different varieties. For Ren’Py users, I’ve created a shader and accompanying tool to customize the look of recoloured images, which is available for free on my itch.io. Colorizing images in-engine will involve more planning beforehand to set up your base images properly, but the results can very closely match hand-coloured assets.
See my tutorials on the colorize shader: How to Format Images for Colorizing in Ren’Py and How to Colorize Images in Ren’Py

Finally, we have the upper echelons of appearance customization, which usually involves mixing and matching assets such as hair, clothing, and body types, as well as choosing colours for many options. These sorts of characters are almost always omitted from CG art due to the work that would be required to account for all the variations, though they may be shown in-game as profile pictures, side sprites, or even in-game sprites.
This approach can allow for an enormous amount of player expression and control over the main character, and the creation process can often be enjoyable in its own right. For players who are less artistically oriented, screenshotting the character they created to share on social media is simpler than drawing a character from scratch and can also help bring traffic to your game.
However, as you might expect, this approach also requires some of the most art assets and work to implement. It also often leads to tradeoffs in other art areas, specifically CGs. Often this kind of approach falls back on the techniques mentioned earlier, where the customizable main character is omitted from CGs or only a small part of them is shown.

If you’d like to use this approach, there are some ways you can make it easier on yourself. Many of these techniques are similar to what Shino talked about for asset reduction, so be sure to go through that talk for more ideas if you missed it (Link to talk). As mentioned earlier, you can colorize images in-engine to reduce the number of handmade colour variations you need.
You can also adopt a simplified art style for either the main character or potentially the whole game. Many art styles, especially exaggerated and cartoonish ones or pixel art can simplify several distinct facial features and body types into one stylized version. You might also choose an art style with fewer colours, such as a black-and-white comic style or a restricted palette to emulate an older game system.
If you’re showing the custom character in-game alongside other character art, consider placing some restrictions on what can be customized, such as shoulder width, clothing, or only allowing some facial features such as the nose and eye shape to be customized so you can reserve the eyebrows and lips for expressions.
Remember you can plan your game around this limitation – maybe your highly customizable character is in a sci-fi setting with mech suits, or they transform into a werewolf with a set appearance you can include in key art, or they have a special head-to-toe spy outfit for their job.
So, how do you actually include customizable appearances in your game?
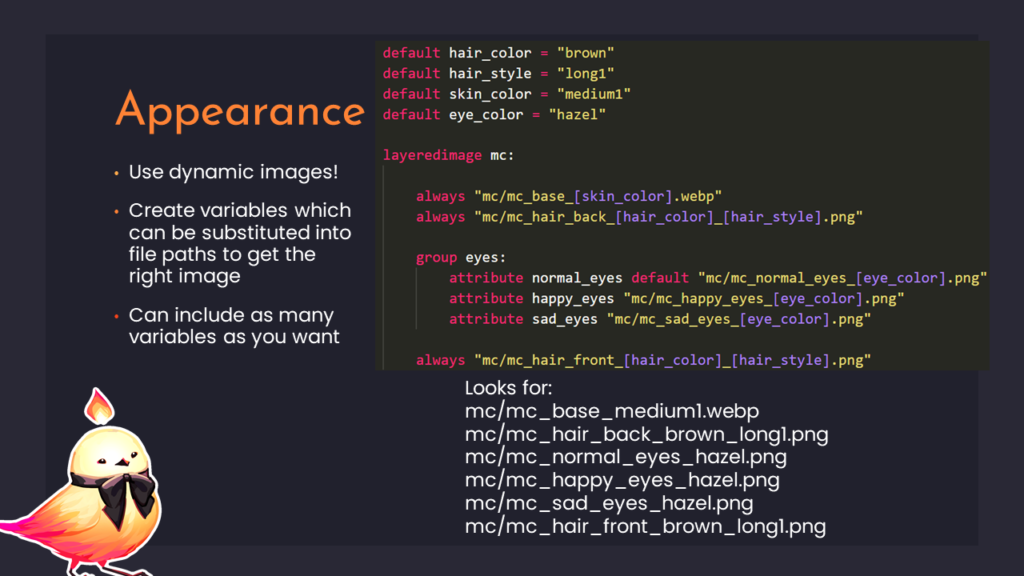
default hair_color = "brown"
default hair_style = "long1"
default skin_color = "medium1"
default eye_color = "hazel"

layeredimage mc:

    always "mc/mc_base_[skin_color].webp"
    always "mc/mc_hair_back_[hair_color]_[hair_style].png"

    group eyes:
        attribute normal_eyes default "mc/mc_normal_eyes_[eye_color].png"
        attribute happy_eyes default "mc/mc_happy_eyes_[eye_color].png"
        attribute sad_eyes default "mc/mc_sad_eyes_[eye_color].png"

    always "mc/mc_hair_front_[hair_color]_[hair_style].png"
This looks for:
mc/mc_base_medium1.webp
mc/mc_hair_back_brown_long1.png
mc/mc_normal_eyes_hazel.png
mc/mc_happy_eyes_hazel.png
mc/mc_sad_eyes_hazel.png
mc/mc_hair_front_brown_long1.png
In Ren’Py you should make use of what are called dynamic images. These are image paths which include a variable. Like with variable substitution in dialogue, the variable’s value is substituted in to find the final image. You can then create buttons on the customization screen to change this variable to values corresponding to the file names. The layered image declared above can be shown with a regular show mc as with any other characters, and if you’ve set up your file names properly, it will pick out the right files.
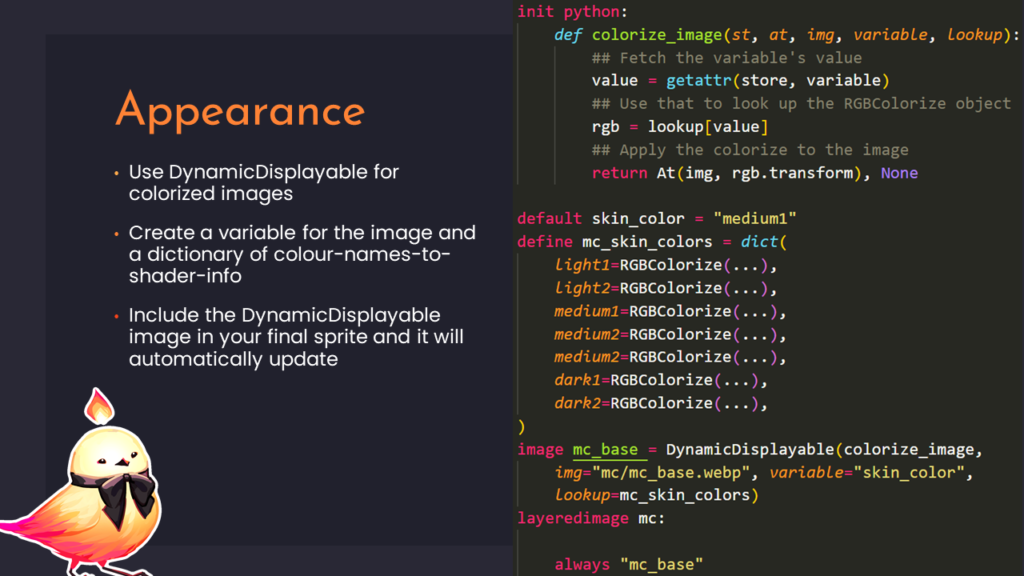
init python:
    def colorize_image(st, at, img, variable, lookup):
        ## Fetch the variable's value
        value = getattr(store, variable)
        ## Use that to look up the RGBColorize object
        rgb = lookup[value]
        ## Apply the colorize to the image
        return At(img, rgb.transform), None

default skin_color = "medium1"
define mc_skin_colors = dict(
    light1=RGBColorize(...),
    light2=RGBColorize(...),
    medium1=RGBColorize(...),
    medium2=RGBColorize(...),
    dark1=RGBColorize(...),
    dark2=RGBColorize(...),
)
image mc_base = DynamicDisplayable(colorize_image, img="mc/mc_base.webp",
    variable="skin_color", lookup=mc_skin_colors)

layeredimage mc:

    always "mc_base"
If you’re using shaders to colorize your images, for example if you’re using my Better Colorize shader, then you can use Dynamic Displayables instead. This works on a similar principle where you have a variable with colour names, but instead of corresponding to file paths they’ll correspond to a dictionary key to look up the colorize information (for my tool I format it into something called an RGBColorize object). Once you’ve got that set up, such as in the example, changing the variable skin_color to another value will automatically change it within the mc layered image. As with the previous method, you can show the layered image normally with a simple show mc command, and it will appear with the colour information you set up.
Background & Personality
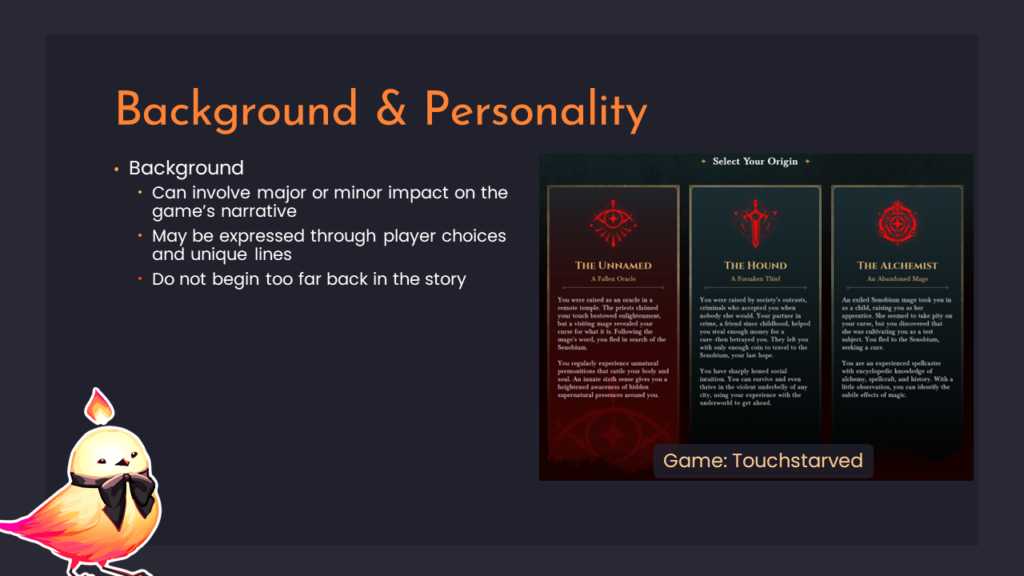
Finally, another avenue of character customization is allowing the player to customize the main character’s background and/or personality. Customizing the background may be as minor as deciding the reason why the main character is attending a magical academy or as major as choosing between multiple different backstories that will affect how the main character is treated within the game narrative and what choices are available to them.
To keep background customization from involving too much extra work, carefully consider where you will begin the story. If the player has the option to choose a background as a farmer or a blacksmith, don’t start the story too early in their life. This could mean you need two entirely different introductions on the farm and in the forge. Start your story where these backgrounds would converge, such as on the day a dragon razed the village and they had to pick up a sword to fight.
You can keep players feeling like their choice of background matters by including occasional unique choice options or lines of dialogue which reference their background. Perhaps the blacksmith has additional dialogue options when discussing weapons, but the farmer knows more about which wild plants are safe to eat while camping.
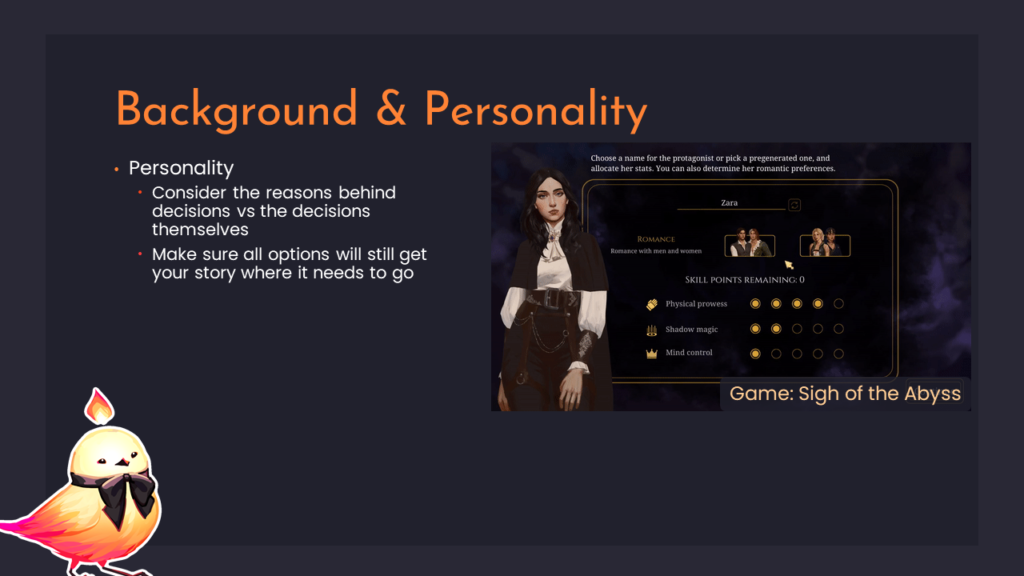
For customizable personality, be sure to consider personality traits which will still get the main character where they need to be by the end of the story. A reluctant hero is just as much of a hero as an enthusiastic one, so long as there are enough motivators to get both to the finish line. Even if the main character needs to make a certain decision for the story to work, you can still provide players with differing reasons why they make that decision – perhaps they join a group of mercenaries out of a desire for safety in numbers, or maybe they join because they want to prove their strength in battle.
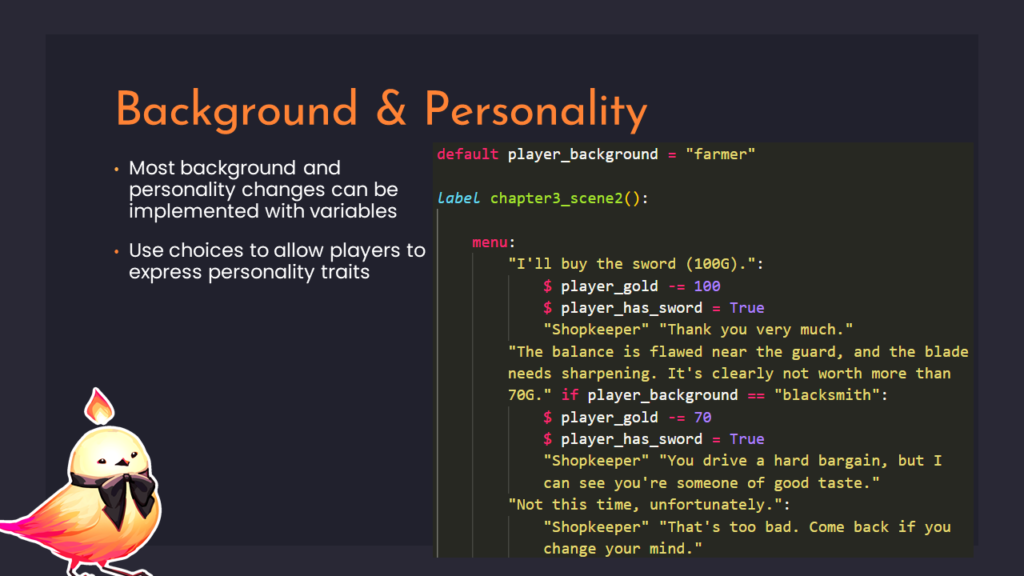
default player_background = "farmer"
label chapter3_scene2():

    menu:
        "I'll buy the sword (100G).":
            $ player_gold -= 100
            $ player_has_sword = True
            "Shopkeeper" "Thank you very much."
        "The balance is flawed near the guard, and the blade needs sharpening. It's clearly not worth more than 70G." if player_background == "blacksmith":
            $ player_gold -= 70
            $ player_has_sword = True
            "Shopkeeper" "You drive a hard bargain, but I can see you're someone of good taste."
        "Not this time, unfortunately.":
            "Shopkeeper" "That's too bad. Come back if you change your mind."
In most cases, selectable backgrounds and customizable personalities can be done entirely through regular variables. You can add conditions in dialogue or for choices to check for the player’s background. In the example on the right, only a player who chose a background as a blacksmith has the option to get a cheaper price on the sword. Be sure to watch Alaric’s talk (link to talk) for more on choice design!
UI Considerations

Besides coding in these customization systems themselves, you will also need to consider how to present the customization to players in-game.
For pronouns, you should set up the common pronouns like she/her, he/him, and they/them for the player to simply select. If you allow custom pronouns, include example sentences with the word substituted in so players can see how it will be used (since most people don’t know the grammatical terms for it). Importantly, do not start the sentence with the target word, because this will often lead players to incorrectly capitalize it. Typically you should respect the player’s capitalization for these words rather than forcing it to lowercase, since for example, some players may enter their name to be used in lieu of pronouns.
Don’t forget to let players choose which conjugation is used for verbs as well, which you can see in the bottom of the screenshot with the title “Which sounds more natural?”
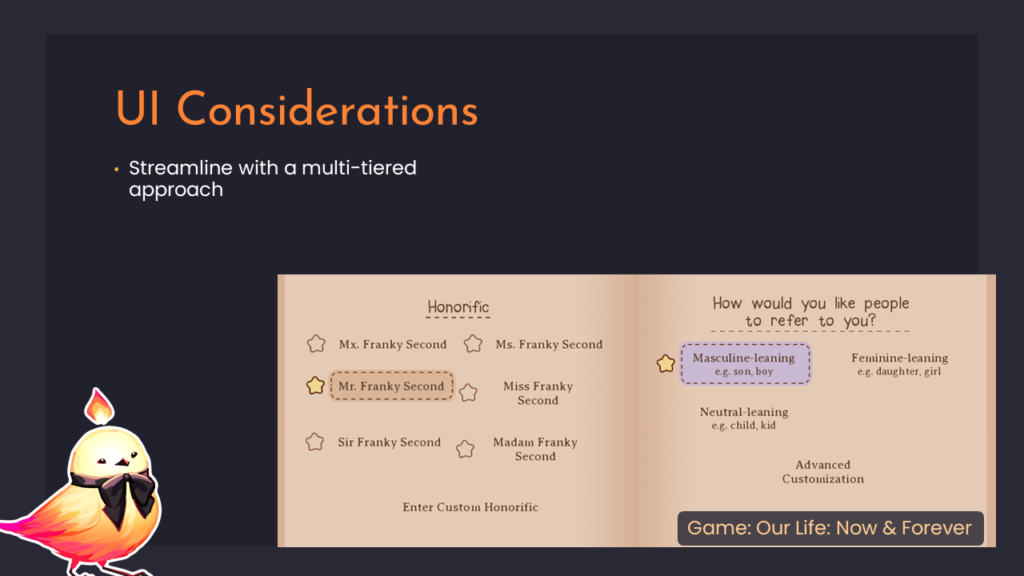
For advanced customization options, such as custom terms, you should aim for a multi-tiered approach to common use cases. For example, a common use case is a player who would like to use he/him pronouns and have all masculine terms like Mr., son, boy, and brother. To make this simpler for this player, when he selects he/him pronouns without diving into the extra options for custom or multiple pronouns, we simply set the default for all of the terms to be masculine as well so this player doesn’t have to go into the advanced options or change any of the setup for this page.
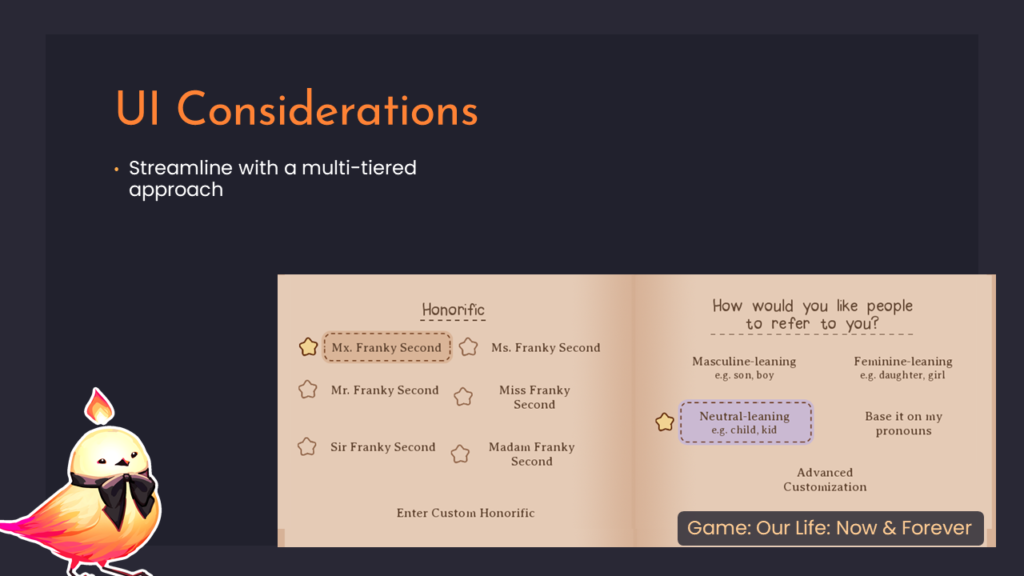
The next tier is for players who want some pronoun customization and have general preferences for which terms are used. For example, there may be a player who uses she/her and they/them, but only wants characters to use neutral terms like child and sibling. For these players, there is a fast option to use only neutral-leaning terms.
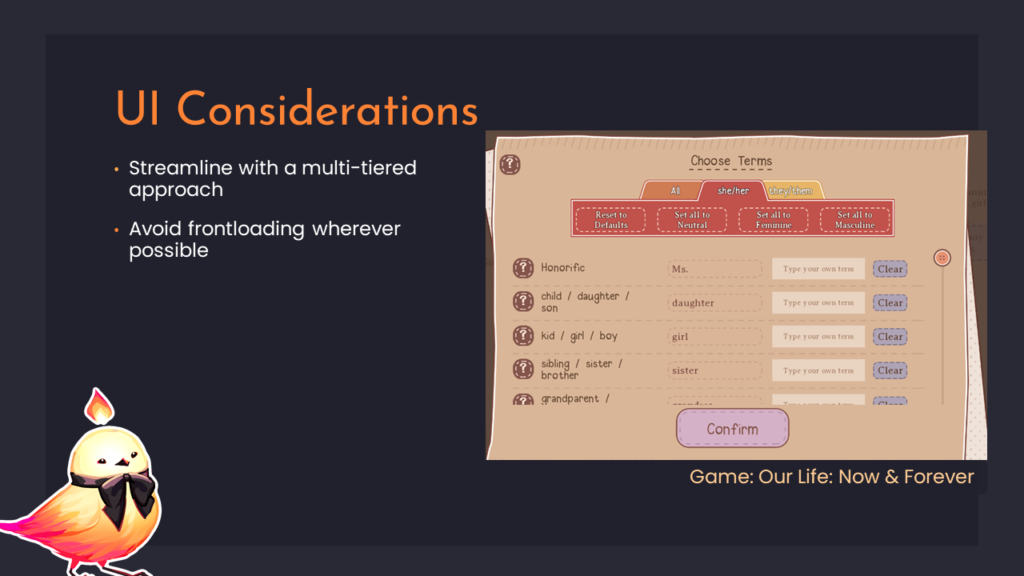
Finally, for players who want the maximum amount of control over their experience, there are the advanced options. Even here, there are shortcut options to mass-set many terms to one of the three pre-defined types. Many players do not need to see or use these options, but for players who want the most control over how the script refers to them, this screen allows them to do so.
This same principle can be applied to appearance options – even if you’re using a shader to colorize images, be sure to provide some pre-set colours that players can mix and match without bring up a complicated colour picker. This will allow players who simply want to pick a few harmonious colours to advance through your customization screens faster to get to the story, but still offers advanced freedom for those who seek it out.
Lastly, wherever possible, spread out customization options into later parts of the script. If the player’s background doesn’t come up until three scenes into the story, especially if you have a lot of other customization options, consider allowing them to choose their background at that point in the story. Allow the player’s personality to be shaped through choices instead of at the start. This becomes more important the more options you have to avoid delaying the player too long before they even know what the experience will be like.
Conclusion
There are so many ways to add character customization to your game that don’t have to be giant time and energy sinks while still offering a ton of benefits. I hope this presentation has given you ideas on where to start.
And that’s all for the talk! I answer a few questions at the end in the video if that interests you also – there are human-made subtitles and a transcript available on YouTube if you need them.
These are all really great tips: I’m enjoying reading through your site! <3
*”tips” is the understatement of the year, actually — the time and effort spent on each in-depth article is mind-blowing. Thanks again!
Thanks so much! I’m really glad you’ve found them helpful ✨