

If you would like to colorize images in your game, there are some best practices to separate image layers and set them up properly for colorizing. This tutorial will cover how to format existing or new images to get the best results for colorizing using Better Colorize for Ren’Py.
If you haven’t already, be sure to start with How to Colorize Images in Ren’Py for the basics on colorizing images using the Colorize Tool.
The concepts covered in this tutorial largely pertain to image manipulation rather than code. You are expected to understand concepts such as image layers, blend modes, and clipping masks. These are only briefly covered during explanations.
Step 1: Layer splits
To start, wherever possible, layers that you wish to colorize should be separated from other, unrelated layers. For example, it is much simpler to have the hair as a separate layer which you can recolour, as opposed to it being attached to the body layer. Similarly, it is much easier to recolour skin when it is not attached to clothing layers. If you would not want the whole image to be recoloured with the same colours, it is often a good idea to split up those parts until it’s down to just one part to recolour.
Here are some examples of good layer splits:
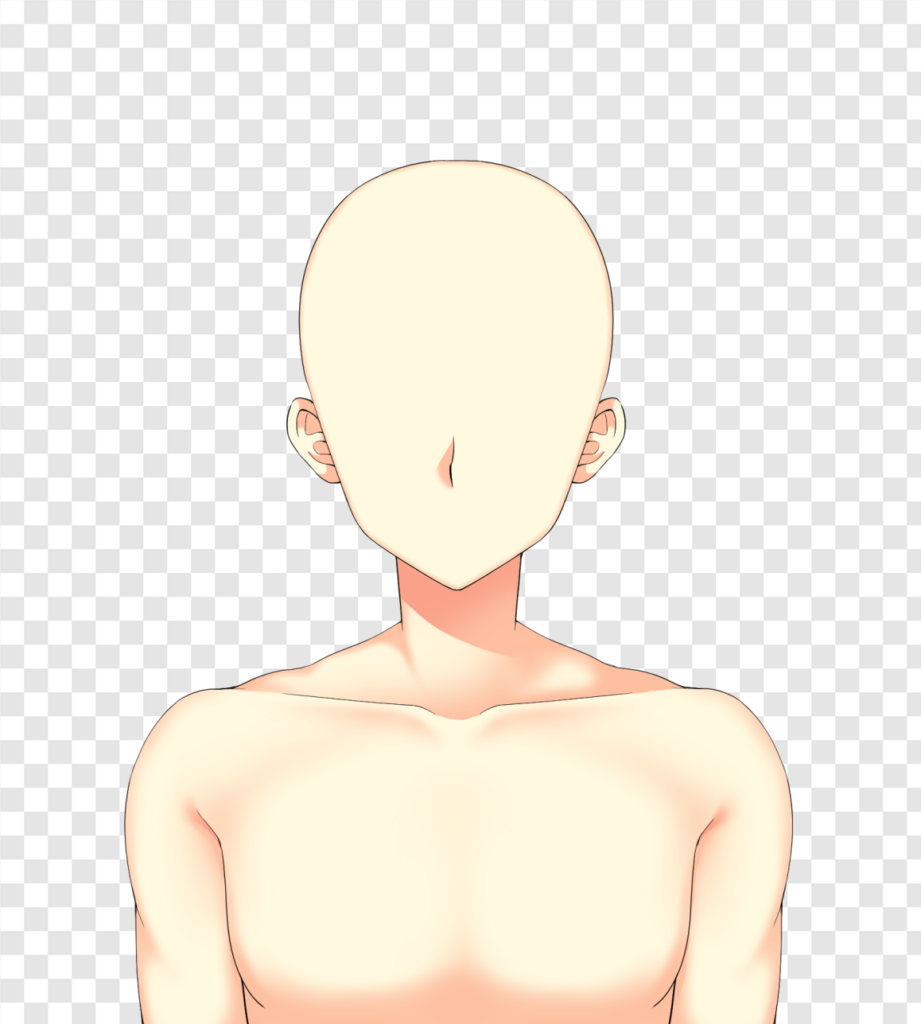

This is a good layer split for recolouring the skin. The skin layer is separate from the clothing layer. You can recolour the skin layer separately without affecting the clothes, eyes, hair, etc., because they are separate from the skin you’re recolouring.


These are good layer splits for recolouring any of the images. On the far left, the skin layer doesn’t have any extra layers attached to it that we wouldn’t want to colour with skin colours. The hair being split up into front and back layers makes it simpler to display it behind the sprite regardless of the outfit or pose of the base skin layer. And lastly, the hair shading that goes between the skin and hair layers is also separated from the hair, so it can be shaded with the skin colours instead of the hair colours.
There are some combinations you may be able to work around, but which will require additional image editing. For example, if you have a “hair shadow” layer included with your hair layer, you will need to make use of one of the RGB colour sets at minimum so you don’t end up recolouring the (skin-toned) shadows with the hair colours.


Here you can see that some skin shadow layers are included directly on the same layer as the hair and clothing. This can be worked around if required, but it is generally better to have the shading on a separate layer so you can colour the hair separately from the skin shadow.
Special cases
There are also images which require specific setup for RGB channels if you aren’t going to split them up into separate layers, the most notable of which are mouth and eye images.
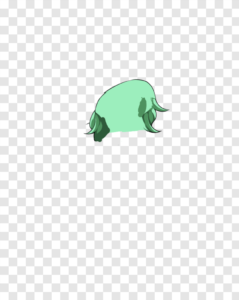
Typically, an eye layer is made up of the eye whites, eyelashes, iris, and optionally the eyelid or other skin shading. For recolouring, you will want the skin to be recoloured with the skin recolouring, the iris with the iris recolouring, and the eye whites and lashes to be constant colours. In order to achieve this, you must either 1) have all these parts on different layers to recolour separately, or 2) use the RGB colour sets to split up the different parts for recolouring.

Similarly, a mouth layer typically consists of the lips, which should use the lip recolouring, and may optionally include surrounding skin or shadows which should use the skin recolouring, and potentially tongue or teeth which should not be recoloured. These must also be either split up onto their own layers to recolour separately or use the RGB colour sets to split the image up into different parts for recolouring.

Other layers which may require either being split up or adjusted for the RGB colour sets:
- Clothing layers with patterns, multiple colours, or accessories
- Hands, particularly if you are recolouring the underside of the hand and supporting darker skin colours, as the palm will need to be recoloured separately. You may also consider recolouring the nails separately if you’d like to add nail polish.
- Hair layers with ombre effects or dyed with roots (can be achieved with the RGB channels)
Layers which you may think need to be split up but will actually be fine for recolouring:
- Art styles with line art – you can specify a colour and threshold for the line art like any other colour.
- Art styles which use multiple colours for shading, e.g green hair which has both a dark green shadow and also purplish shadows – you may need to use the RGB channels to differentiate these in grayscale, but it is possible to shade with different colours so long as they can be told apart in the base image
Step 2: Colours
The first and easiest way to prepare an image layer for recolouring is to simply make it grayscale. You can do this in whichever image editor you like. If you are not using the RGB colour sets, then you will be able to colorize from a non-grayscale image as well, though you will need to choose your threshold numbers from that image and remember to take the greatest of the three RGB values (since they are likely to all be different if they are not a shade of gray). You can also technically use the shader to tweak existing colours, but that’s a topic for another day.
Using RGB channels to separate areas
There are two primary ways to use RGB channels for recolouring. In this tutorial, we’ll look at how you can use them to separate out parts of an image you want to use different colour sets for. Let’s look at how you can use them to split up eye layers for recolouring.

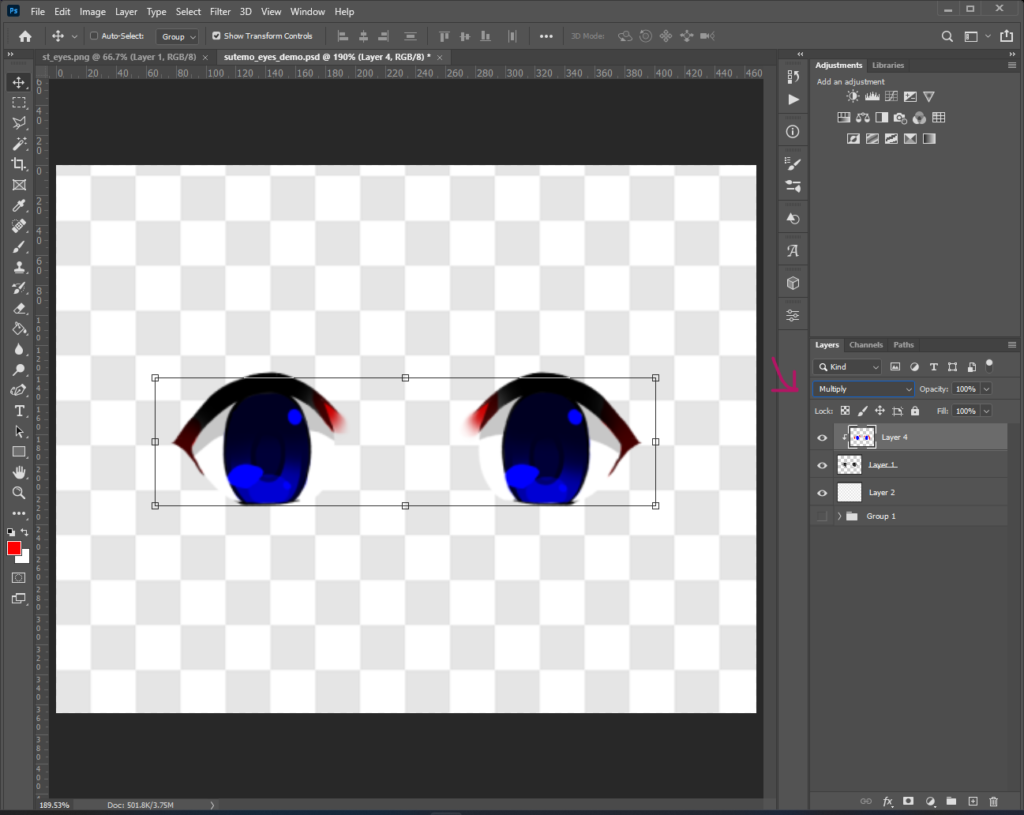
First, make sure you’ve separated the layer as much as you can. Here we have just the eyes – no eyebrows, mouth, etc. We will have a third channel that we don’t use by the end of this which could potentially be used for eye + brow combinations, but it’s easier if they’re separated.
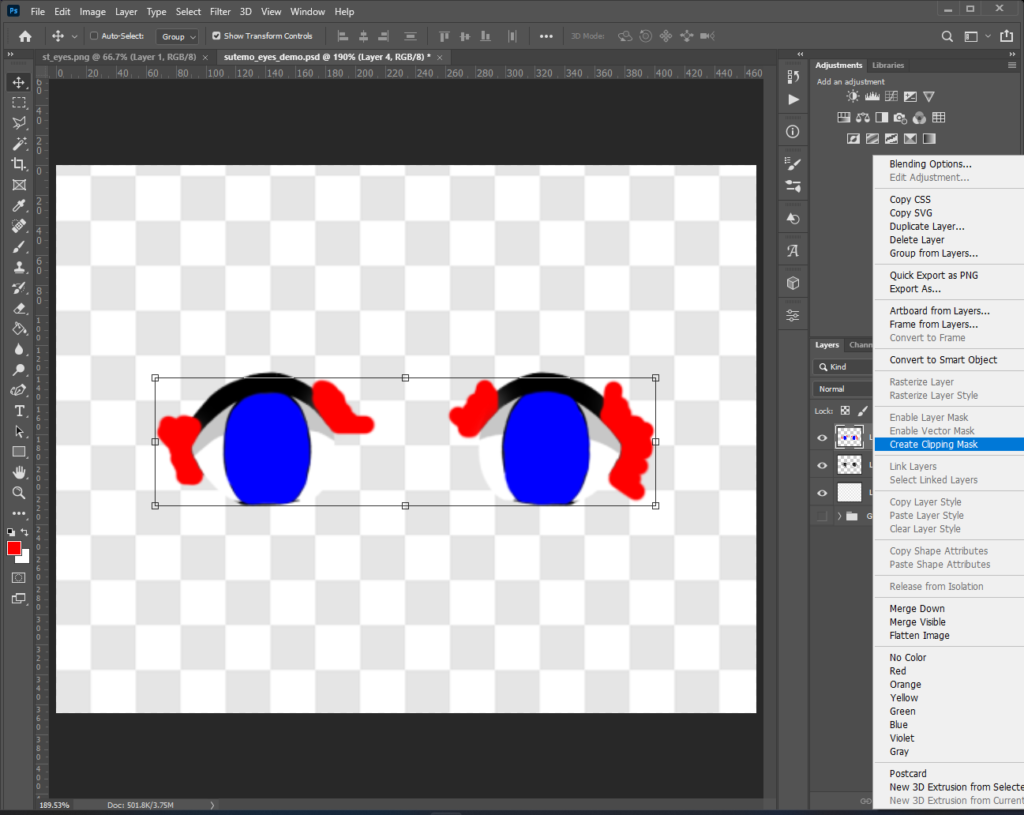
Next, make a new layer on top of the eyes in an image editor such as Photoshop or GIMP. Pick a paintbrush tool and set your foreground colour to #0000FF (the colour is very important!). This is a dark blue. That means that anything we colour in using this colour can use the blue colour set when we colorize it using the colorize tool.
While this will be covered in more detail in the tutorial on blending with RGB colour sets, a quick rule of thumb is that the more blue the base image is, the more of the blue colour set it will use to colorize the image. The same goes for the other colour sets also. That’s why we use #0000FF – it’s the bluest colour we can possibly get, so it guarantees 100% of the blue colour set will be applied instead of the gray, red, or green ones.

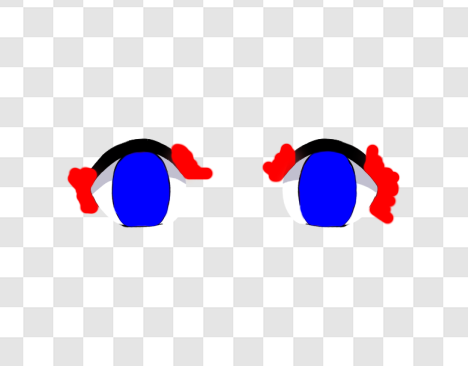
Carefully paint over the iris only on your new layer. You may consider setting the layer opacity to 50-70% so you can see where you’re colouring. Remember to set the opacity back to 100% when you’re done. It should look like this:
Now hide the layer with the blue on it and make a new layer again above the base eyes. Set your paintbrush to the colour #FF0000.

Now we’re going to paint over the parts that have a skin colour to it, as pointed out on the image earlier in the tutorial. That includes the edges of the lashes on both sides. Don’t worry about going outside the lines of the lashes – we’ll mask it out later. Using your brush on the new layer, paint red over the left and right parts of the lashes that look more skin-coloured.
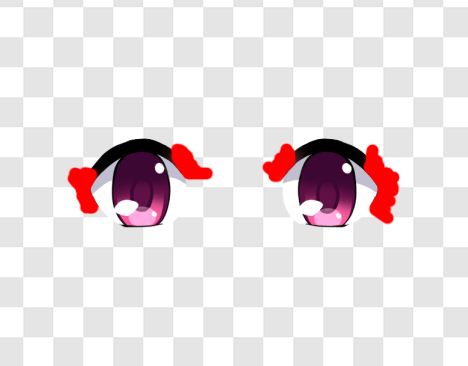
You can see I’m not terribly careful about going outside the lines into the transparent space, but I do make sure I’m not colouring onto the eye whites.
Note: If you have an eyebrow layer combined with the eyes, then you may want to use a green layer (#00FF00) to colour over the eyebrows. The remaining steps will apply to the red, blue, and green layers, in such a case.
Now make the blue layer visible again. While this next step is not strictly required for this example eye image, since the red and blue don’t overlap, it can be crucial for other images so we’ll be doing it regardless. Set both the blue layer and the red layer’s blend modes to lighten and make sure they’re at 100% opacity if you were adjusting that earlier. That will give you an image that looks something like this:

The importance of this step will be more apparent when using RGB channels to add additional colour depth to your colorized image, but here it makes sure the red and blue channels mix properly where they overlap. If we didn’t do this step and just skipped right to merging the layers together, the places where the colours overlap would only show the colour of the layer that’s on top.
Nex, merge the red and blue layers together (NOT the base image layer! Just the two new colour layers you made). You’ll get something that looks like this. If your colour layers overlapped, you may see magenta in those areas.
Now click on your original base eye image and make it grayscale if it isn’t already. In Photoshop, which I’m using, that’s Image -> Adjustments -> Desaturate. Clip the combined colour layer to the eye layer below – again, in Photoshop, this is done by right clicking the layer and hitting “Create Clipping Mask”.
Now your image should look like this:
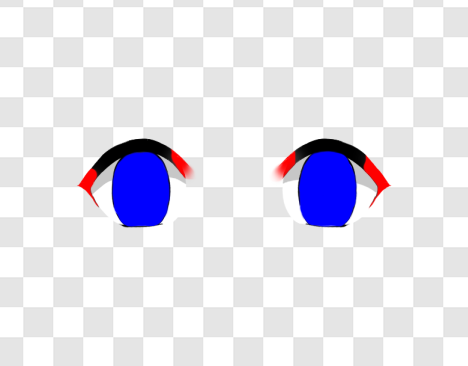
Notice that the red outside of the eye boundaries has been clipped away so it fits the shape of the eyes again.
Finally, set the combined colour layer to “Multiply” blending.
This will allow you to see the darker parts of the original eye layer again, which we’ll use for our thresholds when we’re colorizing the image. And that’s all! Save this image and pop it into the colorize tool.
To colorize the image, you’ll use the same techniques to colour pick as demonstrated in How to Colorize Images in Ren’Py. However, you will be using the RGB channels also to colorize the iris and the skin blending separately from the eye whites and eyelashes.
Important: if your base grayscale image contains black (#000000), you must use the gray colour set to colorize that part of the image black again. None of the RGB colour sets can colorize black, since it has no red, green, or blue – its RGB is (0, 0, 0). However, the colour white (#FFFFFF) in a base grayscale image can be colorized with the colour channels if painted over, because using the multiply blending mode as specified above means that white will instead become the colour you painted over it with. See the white highlights of the eyes above in the RGB base image – they are #0000FF instead of #FFFFFF due to the blending, which means they’ll be colorized with the blue colour set.
Our colour sets will be used as follows:
- Gray colour set: to colorize the eye whites and eye lashes. Notably this includes colorizing anything that is pure black also, so we need to include black as one of our swatches.
- Blue colour set: to colorize the iris.
- Red colour set: to colorize the skin shading
- Optional – if you used the green colour set for eyebrows as described above, you would use the green colour set also. In this example, it is not used.
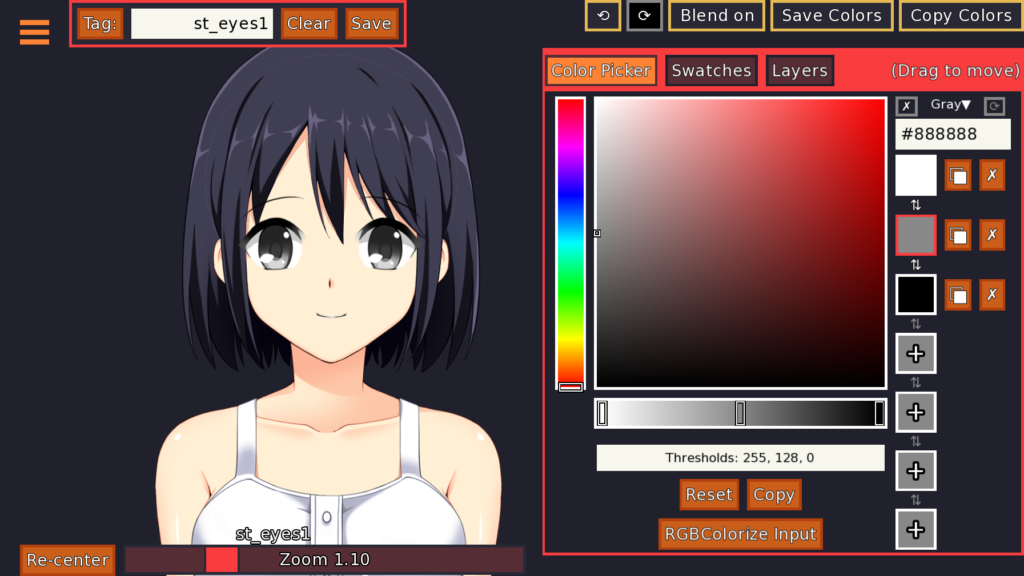
To start using the RGB colour sets, click the ✗ next to the word “Gray” above the swatch hexcode input box. This will change it to a checkmark and turn on the RGB colour sets.

Now click on “Gray▼” to see a dropdown for the different colour sets. Select the blue set. Initially, it will look just like the gray set.
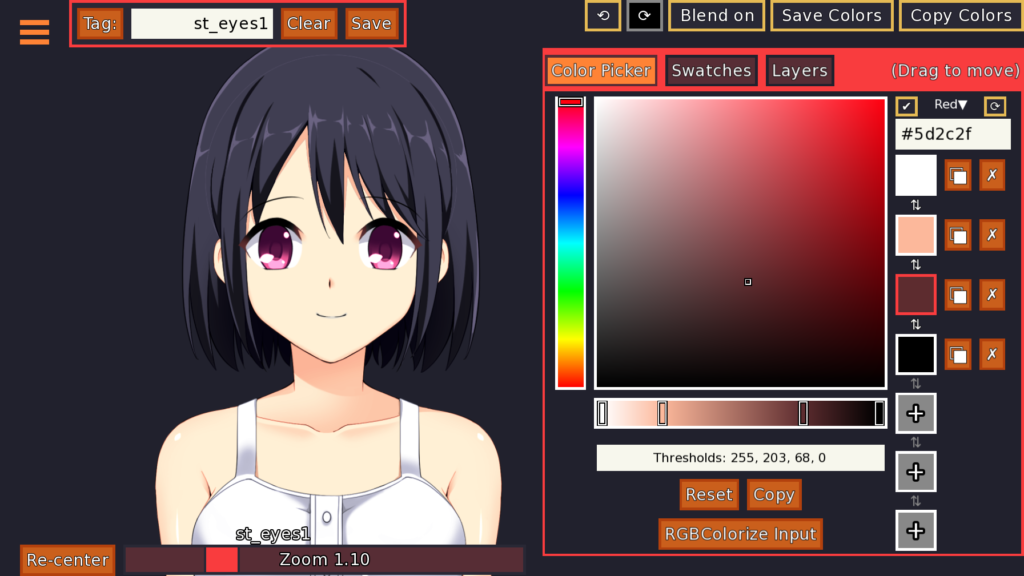
You can now employ the techniques in How to Colorize Images in Ren’Py to select colours for just the iris. Remember that when you’re looking at the RGB values of the base image to figure out thresholds, you need the greatest of the first three values – for example, the threshold for the highlight in the iris is 255, because the colour is (0, 0, 255). I’ve achieved the results below using the colours #ffffff, #ffaae1, #f65b9a, #3c0833, #000000, and the thresholds 255, 212, 168, 34, 0. Notice in particular how the eye highlights, which were #0000FF in the base image, can be colorized back to white here.

Finally, select the Red colour set from the dropdown. This will colorize the skin parts, which are currently still gray. I’ve used the colours #ffffff, #fcb89b, #5d2c2f, #000000, and the thresholds 255, 203, 68, 0.
And that’s how you can use the RGB colour sets to separate areas on the same image for colorizing! As before, you can copy out the colours and thresholds the Copy Colors button in the top right corner to get an RGBColorize object which you can apply in-game as a transform.
You can use this same technique to separate out colour sets to colorize lips without recolouring the teeth also, to separate hair shading layers from the hair itself, or for anything you’d like to use several distinct colours with.
Summary
- You should split up layers for colorizing by separating them based on if you would use the same set of colours to colorize them or not. For example, you wouldn’t use hair colours to colorize the shadow the hair casts on the skin of the character, so the hair shadow should be on a separate layer from the hair
- Similarly, accessories and clothing items should generally be separated into different layers for colorizing (or for leaving as-is in their original colours)
- Layers you want to recolour should typically be desaturated so they are grayscale
- If you need to colorize some areas of an image separately but can’t/don’t have them on separate layers, such as the iris of an eye vs the whites, or teeth vs lip colour, you can use red, green, or blue to paint over the areas and “section them off”.
- The colour layers should then be set to “lighten” blend mode and merged
- The final combined layer should be clipped to the original base layer
- Finally, turn the colour layer on “multiply” blend mode and save it
Conclusion
In the next tutorial, we’ll go over techniques using the RGB channels to add additional depth to colorized images. This is particularly helpful for recolouring skin layers and for art styles which use multiple colours to shade hair layers. It is also helpful for more complicated recolouring, such as hair with an ombre gradient or grown-in roots, eyes with central heterochromia, and more. Be sure to check out my itch.io for more Ren’Py tools!

