The next four size properties we’ll look at in this tutorial are less common, but may still come in handy as you learn to create screens with Ren’Py.
If you haven’t already, you should start with the first part of this tutorial on xysize, minimum, and maximum, here: Ren’Py Size Properties – xysize, maximum, and minimum. Or, if you’re new to my screen language series or screen language in general, be sure to start at Getting Started with Ren’Py Screen Language.
Once again, in these tutorials I use element to refer to the thing you’re trying to change the size of, and container to refer to the space the element is positioned inside. The container is by default the entire screen. element can be anything; an image, a bit of text, a button, etc.
fill
Fill does not have a “combined” property, only xfill and yfill. Generally, it is only for containers. xfill and yfill won’t work directly on images added using add or text added using text.
This property causes the container to expand to fill up as much space as it can in the specified direction (so, horizontally for xfill and vertically for yfill). Instead of providing a number, xfill and yfill are set to False by default, which means they only take up as much space as they need to render on the screen properly (or that they will be whatever size they are provided using xysize, minimum, or maximum as covered in the previous tutorial). If this property is set to True instead, the container will take up as much space as possible in the given direction.
In the default GUI, for example, xfill True is used for the dialogue window to specify that it should be the width of the whole screen. This property can also be useful to create things such as separators between elements in containers like hbox and vbox, or any kind of banner or background.
Note that if you put a container with xfill True inside a container without a set size, for example, the container will effectively also be xfill True, taking up all the possible width of the container’s container. Since in this case the container doesn’t have a size, it tries to be only as large as it needs to be to contain everything inside it. But one of the things inside it is trying to be as big as it can, which causes the container to also take up as much space as it can. To prevent this, you can give the container a set size or at least a maximum size so the element is restricted from getting too large.
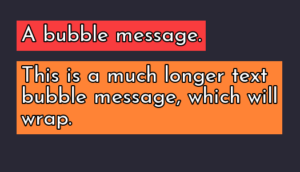
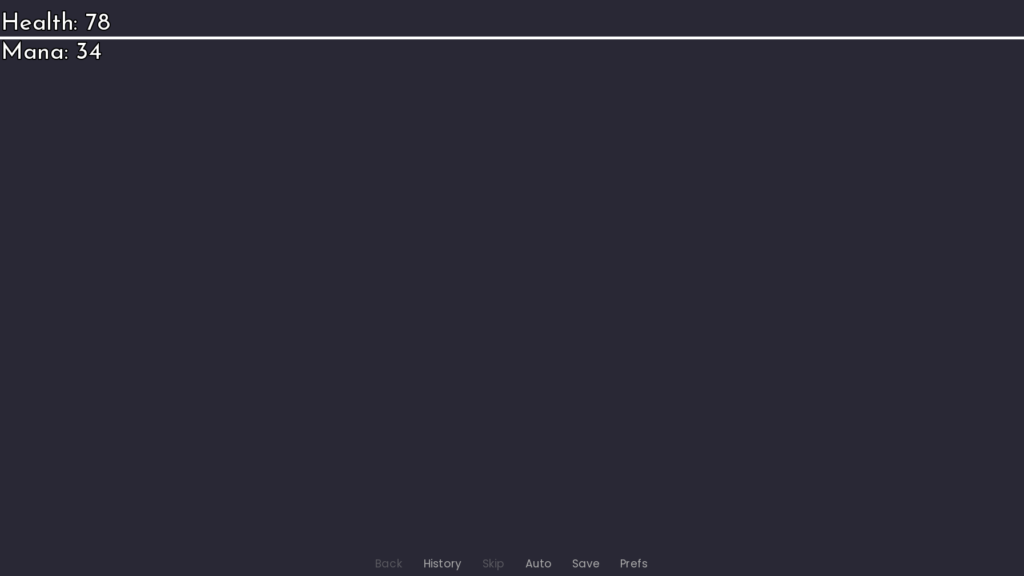
Here is an example of a vbox which has a solid line of colour as a separator between the text elements:

vbox:
    xsize 300
    text "Health: [hp]"
    fixed:
        xfill True ysize 5
        add "#ffffff" # white
    text "Mana: [mp]"
Note that add "#ffffff", aka the add statement with a hex colour code, adds a rectangle of the provided colour, much like you saw earlier with the red and orange messenger bubbles. This rectangle will be as large as possible, so ysize 5 is needed to restrict its height. xfill True on the fixed container ensures the container (and thus the white line) will be as wide as possible.
The line will be 300×5 pixels, since the vbox has xsize 300, so the maximum width the line can be is 300 pixels. But if you change the width of the vbox, you won’t have to update the widths of all the different separator lines, since they’ll just scale with the size of the vbox.
Note that if the xsize 300 wasn’t there for the vbox, the line would take up the whole screen:
fit
Only fixed containers have the fit properties xfit and yfit. Like with fill, there is no combined “fit” property, just the two separate ones. However there’s actually a special fit property for Transforms which does something mostly unrelated to xfit and yfit as described below, which I will cover in a shorter tutorial after this one.
fit properties are False by default. If set to True, xfit True will cause the fixed to shrink such that it is only as wide as it needs to be to contain the rightmost element. Similarly, yfit True will size the fixed such that it’s only as tall as it needs to be to fit the bottommost element.


Above, the first image has xfit True yfit True and the second image does not. By adding a background, you can see that this affects the size of the final image.
fixed:
    xfit True yfit True
    add "feniks"
    add "music_note" xpos 850 ypos 30
Note that moving the music note over further (xpos 1050) will continue to expand the container so it fits:

This is mostly useful if you’ve got a bunch of elements inside the fixed of various sizes and need to ensure it is only as large as it needs to be to contain them all. Typically, if you position an element inside of a fixed with properties like xpos or ypos, the fixed will become as large as possible (often the size of the screen). Using xfit and yfit will prevent this and make sure the container doesn’t expand to be unnecessarily large.
fit_first
Fixed containers also have a special property, fit_first. This is one of four values: False, the default, means it isn’t used, so the size of the fixed will depend on any other sizing properties applied to it, like xfill/yfill, xysize etc., as well as the size of all the elements inside the fixed. fit_first True means the fixed will fit the first element inside it (aka it’ll be the size of the element at the top of the fixed’s list of elements, code-wise). So if you’ve got two things in your fixed like so:

fixed:
    fit_first True
    add "feniks.png"
    text "Hello! This line will wrap when it reaches the end of the image."
then the fixed will be the size of "feniks.png", however large that image is. The size of text "Hello!" will not matter at all, because it is the second element in the fixed, and the fixed is only concerned with the size of the first element.
fit_first also takes the string “width” or “height”, as in fit_first "width" or fit_first "height". This is similar to setting fit_first to True, except it will only fit the width or the height of the first item (and not the full size of it). So, if we used fit_first "height" for the above example, if text "Hello!" is wider than the image “zoran.png”, then the fixed will be at least as wide as it needs to be to accommodate the width of the text, and it will be exactly as tall as the height of “feniks.png” since fit_first "height" will fit the height of the first element, which is “feniks.png”. We can see this if we put the fixed inside a vbox:

vbox:
    fixed:
        fit_first "height"
        add "feniks.png"
        text "Hello! This line will not wrap when it reaches the end of the image."
    text "This is below the image."
Note: Recall that just because a container is a certain size internally doesn’t mean that it will crop or resize its contents to reflect that size. If you put another image inside a container with fit_first True which was larger than the first image that the container is fitting, it will simply cover the original image and display outside the bounds of the container.
size_group
size_group is fairly uncommon, but crucially it is used in the default Ren’Py GUI, so it’s important to understand what it does so you can modify it (or understand when to remove it).
size_group takes a string, which will be the name of a group (you make up this string to be the group name). Any containers which have a size_group with this same string name will belong to the same size group. All containers with the same size_group will be the exact same size.
Notably, size_group can only be used with windows, frames, labels, buttons, and textbuttons. For the purposes of demonstration using the tools you’ve learned so far, textbutton is pretty similar to text.
In practice, it looks like this:
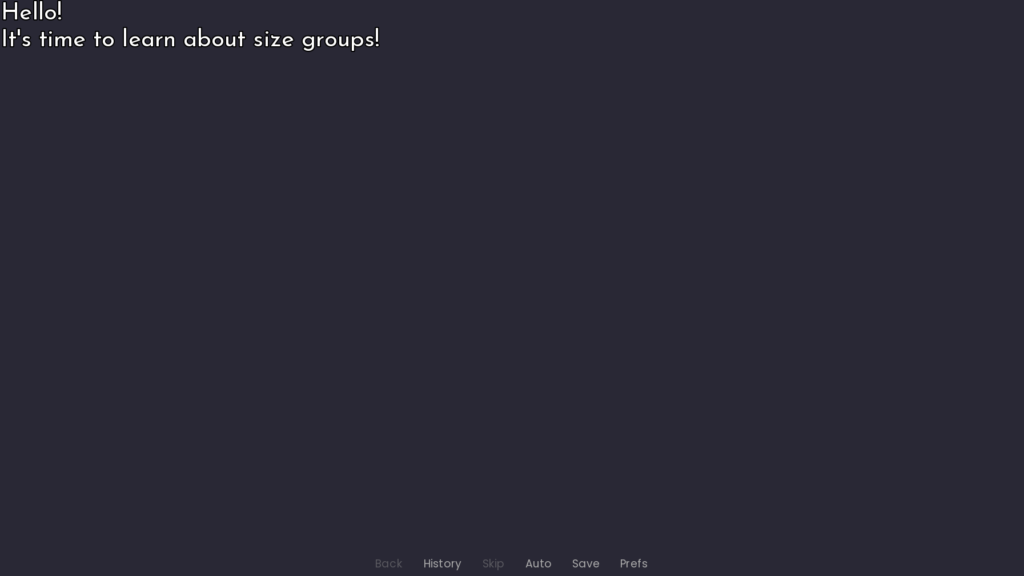
vbox:
    textbutton "Hello!" size_group "mygroup"
    textbutton "It's time to learn about size groups!" size_group "mygroup"
For the above example, both lines of text have the same size_group. By default, that means that they will both be the size of the largest item, so in this case, text "Hello!" will have a bunch of extra space so it’s the same length as text "It's time to learn about size groups!". You can see this the most clearly if it’s turned into an hbox:
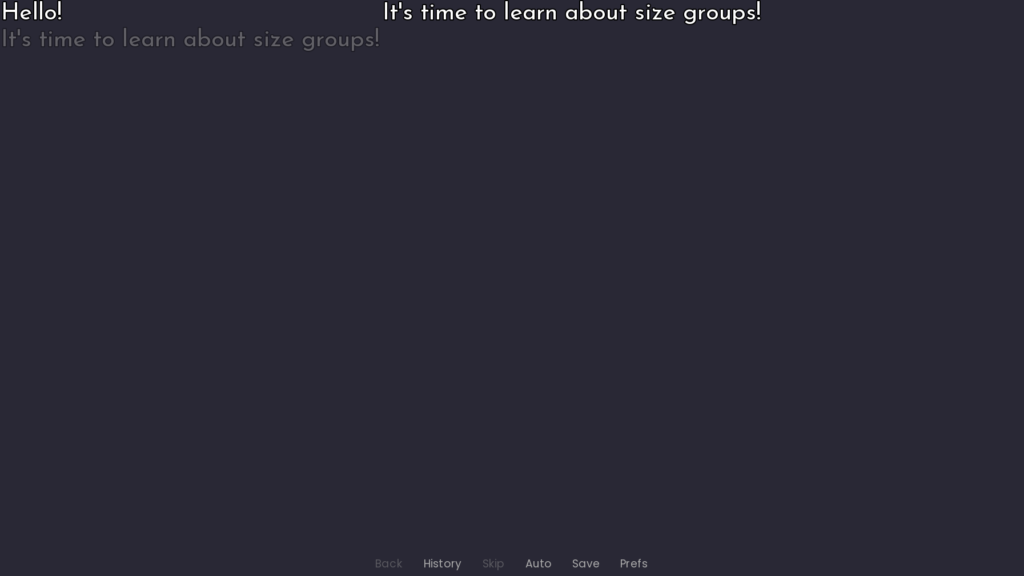
hbox:
    text "Hello!" size_group "mygroup"
    text "It's time to learn about size groups!" size_group "mygroup"
If we put the “It’s time to learn about size groups!” text below “Hello!”, you can see that all the space to the right is because of how long that text is.
In the default Ren’Py GUI, this is used in a very similar manner to make all the navigation buttons (by default on the left side of menu screens like “Start”, “Load”, “Preferences” etc) the same width. This can give a more unified look to the buttons, particularly if you give them a background. With a size group, the backgrounds will all be the same size for a more cohesive look as opposed to each button having a background be only as wide as it needs to be to contain the text.
Of course, if you change the navigation menu to be in an hbox instead of a vbox, this size_group can be undesirable, because it makes all the buttons the same width and can cause the spacing to look uneven between each button (since something like “Start” will have more spacing to its left and right than a word like “Preferences” if all elements are the same size). Thus in such cases you may decide to get rid of the size_group property, unless you are using a particular button style, like seen below.

In the above image, the first two rows have the same size_group across all buttons. You can see the uneven spacing in the first row looks more natural in the second. In the third row, the buttons do not have a size_group and thus have different widths.
area
The last size property we’ll look at is actually a combination of size and position, hence why it’s last. area takes four numbers inside parentheses, separated by commas. Those numbers correspond to (xpos, ypos, xsize, ysize) or more colloquially, (x, y, width, height) of the displayable. Since it is setting both the pos and xysize of the element, it is incompatible with those properties or any properties that set them, like align or xycenter. Unlike with the properties seen above, almost any element can use area, not just containers.
area is most useful for something like the mousearea element, where it can be used to quickly specify a location for the mousearea to apply to. This (x, y, width, height) format is also used in other places around Ren’Py – hotspots are also set up as (x, y, width, height), as are crop areas.
In general this is one of the less common position/size properties, and it’s usually more common to set the pos and xysize individually. In-game, it usually looks like the following:
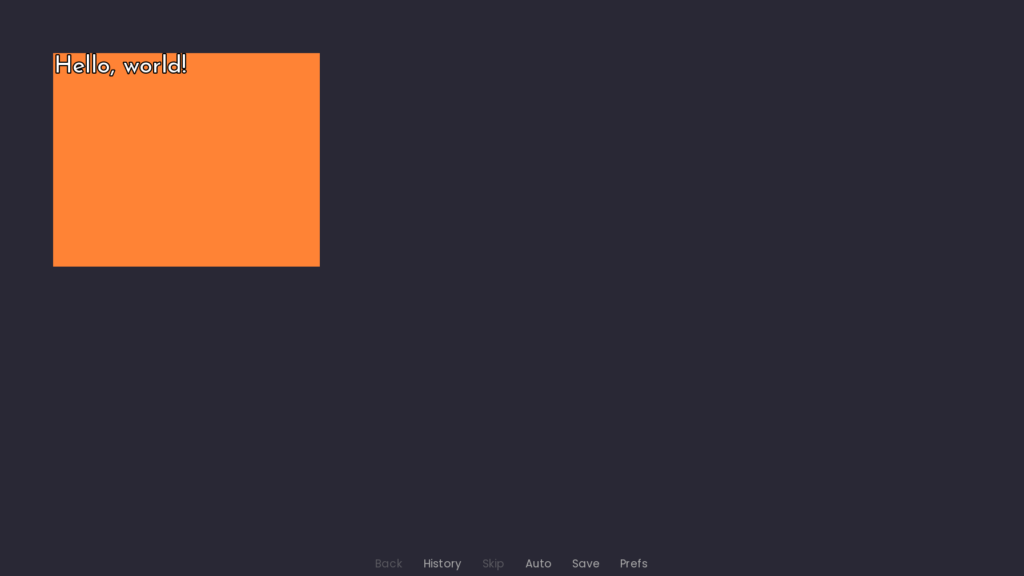
fixed:
    area (100, 100, 500, 400)
    add "#ff8335" # Orange
    text "Hello, world!"
This declares a fixed that is 500×400 and positioned with its top-left corner at the position (100, 100).
Summary
xfillandyfillare used to tell a container to take up as much space horizontally and vertically as possible, respectively. It only applies to screen elements that change their size, so, containers likefixed,hbox, etc.fixedcontainers have thexfitandyfitproperties. This property tells the container to try to only be as wide/tall as it needs to be to contain its children.fixedcontainers also have thefit_firstproperty. This can be set tofit_first "width"to make the fixed as wide as its first child,fit_first "height"to make it as tall as its first child, orfit_first Trueto make it the size of its first child.size_groupcan be given to windows, frames, labels, buttons, and textbuttons. It takes the name of a group as a string. Any screen elements which have the samesize_groupwill be the same size.areatakes four numbers which correspond to the(xpos, ypos, xsize, ysize)of the element.
Next Steps
The next article in this series will be on the ATL fit property, which is unrelated to the xfit and yfit explained here, but can help you make images which conform to particular dimensions (especially useful for things like profile screens or gallery thumbnails, where you may be resizing existing art). After that, the next screen language topic is on frame!
Next week I’ll be foregoing tool/tutorial releases as I’m giving a talk at Visual;Conference on the 27th! Find more information on how to attend at https://vnconf.com/. After the event, the talk will be added to YouTube and I’ll link it here for you to watch.