If you follow me on itch.io, you might have noticed I’m releasing a lot of tools lately! One of the tools I released is called Ren’Py Layered Image Masks, which you can find below:
This tool makes it possible to apply an AlphaMask to a layered image. But what is an AlphaMask? How does it work? What does it do? In this tutorial, you will see how several examples of how AlphaMask works, and how to use it with layered images using the tool above. Pick it up from itch.io to get started!
This tutorial expects you to already understand the basics of layered images and image tagging with attributes. In particular, you should be able to declare a layered image. Ideally, you will also have some familiarity with LayeredImageProxy, which the tutorial’s LayeredImageMask is based off of. You should also have some basic understanding of transform properties – crop is used extensively here, with a brief explanation on how it works.
What is an AlphaMask?
First, what is an AlphaMask? An AlphaMask in Ren’Py is made up of two parts: the child image, and the mask image. Ren’Py combines these two images together to display a final image which is masked by the mask image.
“Child image” and “mask image” might sound confusing, so let me show you a quick example.

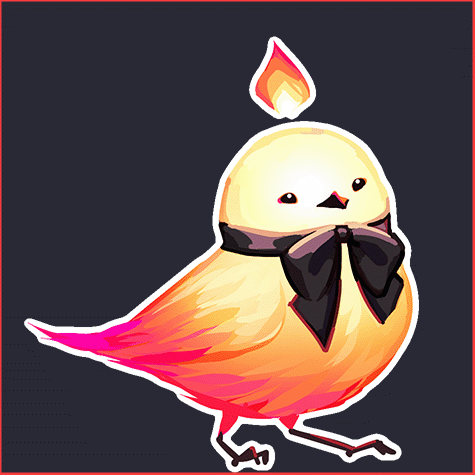
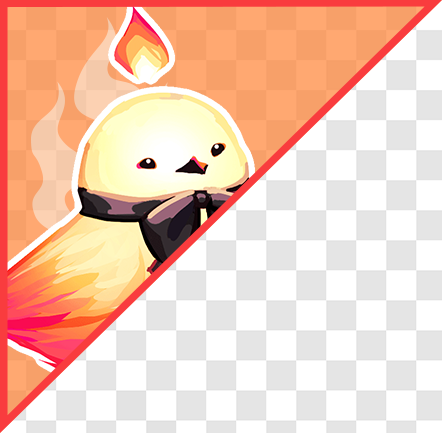
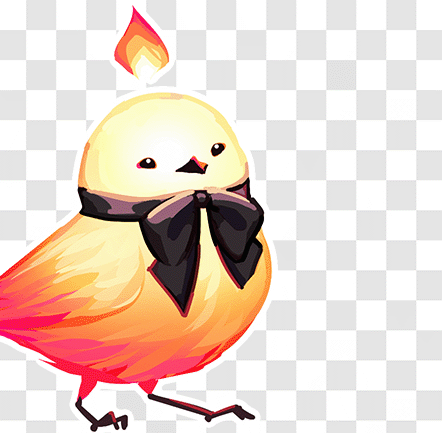
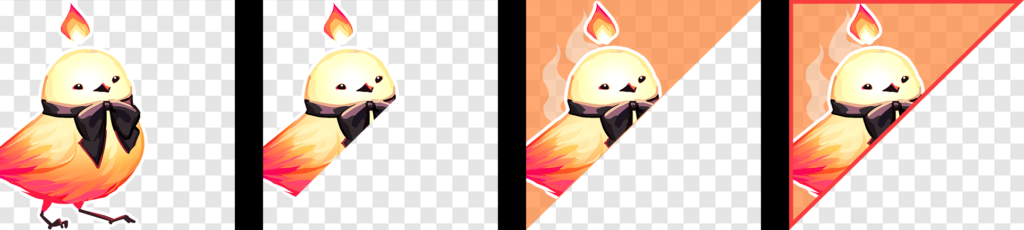
This is the child image. In this case, it’s a picture of Feniks, my little phoenix bird. Note that the image has a solid background as well. (In these screenshots, transparency will be represented by a grey and white checkerboard pattern so it’s more easily distinguishable).
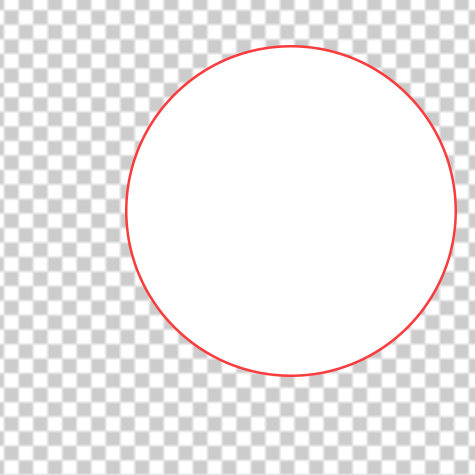
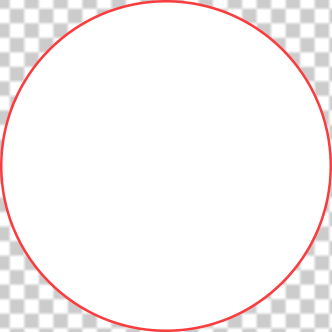
This is the mask image. It does have transparency – a lot of it, all around the circle. The circle itself is solidly filled in.
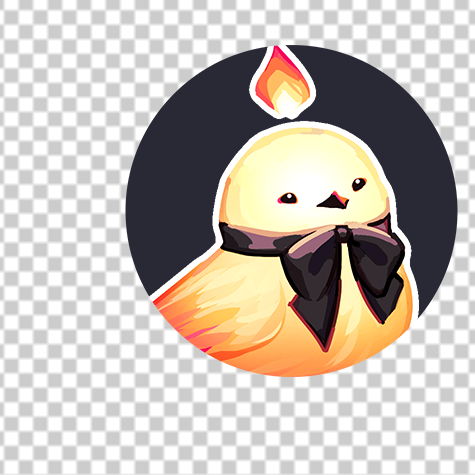
And this is the final result, which is achieved via the code:
image feniks_masked = AlphaMask("fen_child.png", "fen_circle.png")In short, the parts of the mask that weren’t transparent are the only parts left of the child image that are still showing.
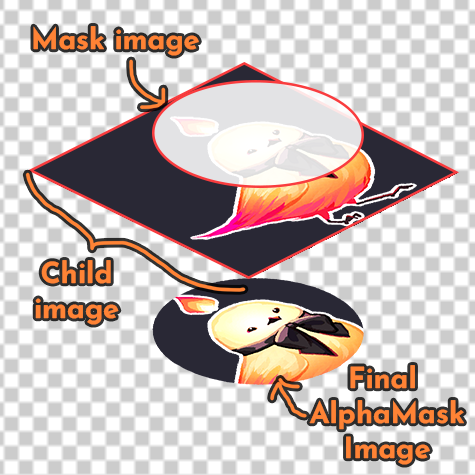
Here, with the mask and child image split up a little from each other, you can better see how the part of the mask that’s transparent ends up also transparent in the final image, so the only thing that’s showing is the part that would be inside the circle. Here’s a gif to illustrate this as well:

How does this work with Layered Images?
The main feature provided by the Layered Image Masks tool is the ability to use a layered image for the child of an AlphaMask. So, instead of just a static child image like "fen_child.png", you can declare the child to be the layered image feniks and then dynamically change the attributes of the child image using lines like show feniks happy masked, and the child image is updated to feniks happy without needing to declare an AlphaMask for every possible attribute combination.
Without LayeredImageMask, you would need code like:
image feniks happy masked = AlphaMask("feniks happy", "fen_circle.png")
image feniks nervous masked = AlphaMask("feniks nervous", "fen_circle.png")
image feniks sad masked = AlphaMask("feniks sad", "fen_circle.png")
This could very quickly get impractical, especially if your layered image has several groups for things like eyes, brows, mouths etc, and you need a different declaration for every single combination.
Enter the LayeredImageMask, a Displayable which is similar to the built-in LayeredImageProxy. It will pass along any layered image attributes to the child of an AlphaMask. It can turn the above code into:
image feniks masked = LayeredImageMask("feniks", mask="fen_circle.png")Then you can still use show feniks happy masked and show feniks nervous masked, and the images will automatically get the AlphaMask applied.
Caveats
One thing I haven’t mentioned, but which you may have noticed, is that it’s generally important that the child image and the mask image be the same size. The final size of the AlphaMask will be the size of the child image, which is typically the larger of the two. In fact, the final image from earlier has quite a lot of transparent space around it:
Sometimes this is all right, but there are two main reasons this can cause issues:
- If you use the same mask for multiple images, e.g. multiple different character sprites, you might have to re-save the mask in different positions relative to the size and position of the sprites. For example, if one character is taller than another, the mask will likely need to have the circle positioned higher up.
- Though invisible, the transparent space still takes up “room” when positioning the final image. So, if you wanted to align this masked image to the bottom-left corner, it would have a chunk of space around it since it’s still the size of the child image, which used to take up that whole space.

Cropping the Images
The easiest fix for this issue is to crop the child image so it’s the same size as the mask, and to make the mask as small as possible. So with that in mind, here’s the adjusted mask image:
All the transparent space is cropped away, so the final image is only as large as the circle is.
In particular, the cropped mask is 332×332 pixels (you can typically right-click on the image in your file explorer -> Properties to see this information). Let’s start by applying it as-is to the child image:
image feniks masked = LayeredImageMask("feniks", mask="fen_circle_cropped.png")
Still a lot of transparent space around the image, and now it’s not centered over Feniks’ face either. Why?
Well, we haven’t moved the mask around or cropped the child image, so it’s naturally positioned at the top-left corner of the child image and masked from there. We need to cut down the child image so it’s the same size as the mask to get rid of that extra transparent space. The child image is 475×475 pixels. So we need to crop it down to 332×332 pixels.
Thankfully, Ren’Py will let you do this in-code, and there’s even a transform property in LayeredImageMask where you can provide this information. Roughly, let’s see what this looks like:
image feniks masked = LayeredImageMask("feniks",
    Transform(crop=(0, 0, 332, 332)), mask="fen_circle_cropped.png")
Pretty similar to the earlier declaration, but with this new part: Transform(crop=(0, 0, 332, 332)). What does that look like?
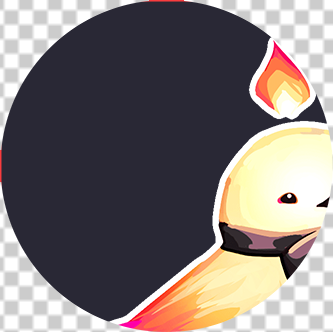
Hmm… still not quite what we’re looking for, but the extra transparent space is gone now. The issue here is where our transform starts. The crop numbers (0, 0, 332, 332) correspond to (x, y, width, height) respectively. This means that our crop starts at the position (0, 0) and is then 332 pixels by 332 pixels. This means it’s the size we want, but it starts in the top left corner, which doesn’t center Feniks’ face.
To fix this, we need to “move the mask over”. But in practice what this looks like is cropping the child image starting from a different position. If you have an image editor, you can use it to get the coordinates you need. In this case, we need the mask to be 127 pixels over from the left and 46 pixels down from the top of the child image.
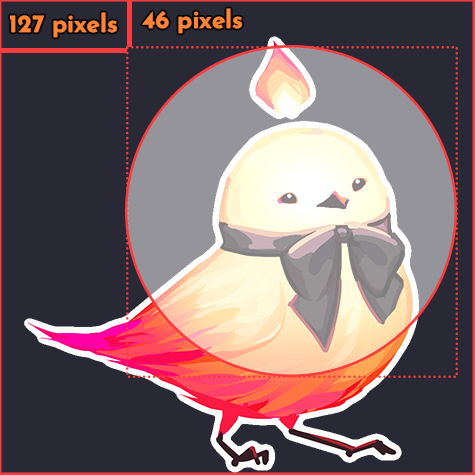
Thus, the final crop will look like (127, 46, 332, 332). Note that the final two 332, 332 don’t change – remember, the last two numbers are the width and height of the final cropped image, and those should always be 332×332 since that’s the dimensions of the mask. The first two numbers changing doesn’t affect the last two numbers.
Notably, Transform("feniks", crop=(127, 46, 332, 332)) would give us the following image:

This makes it the same size as the AlphaMask, 332×332.
So, now the LayeredImageAlphaMask looks like this:
image feniks masked = LayeredImageMask("feniks",
    Transform(crop=(127, 46, 332, 332)), mask="fen_circle_cropped.png")
And that results in this:
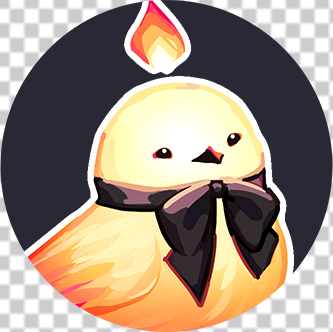

Which, if we position it in the bottom left corner…

It’s a perfect fit! The image is now the exact size of the visible circle. This is why it’s important to use the crop feature with Transform on your LayeredImageMask, both so it’s easy to center or otherwise move the final masked image around, and also so you can center any focal points within the masked area itself (like the character’s face).
If you wanted to do this effect, but not with a layered image, the code would instead just use a regular AlphaMask and would look like the following:
image feniks masked = AlphaMask(
    Transform("feniks.png", crop=(127, 46, 332, 332)),
    mask="fen_circle_cropped.png")
Additional Note
Somewhat counter-intuitively, you can also use negative numbers for the first two crop arguments to add space to the left and top of the child image, respectively. A crop like crop=(-10, -20, 100, 100) is basically saying “I would like to start 10 pixels to the left of the left edge of the image, and 20 pixels from the top, and then cut out a 100×100 square”.
This might sound odd, but it can be useful, particularly when masking sprites which have very little space at the top of their head. If you wanted to “move the sprite down” relative to the mask image, you can just include some of the extra space above the sprite in the crop, which results in the sprite being “moved down” in the final masked image.
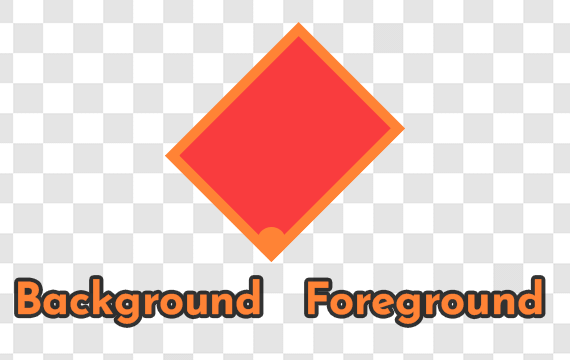
Foregrounds and Backgrounds
Besides just masking an image, LayeredImageMask also allows you to provide optional foreground and background properties. What do those do?
These properties are primarily intended for “cut-ins”, that is, times when you use a small section of a character’s sprite image accompanied by some UI behind and/or in front of the sprite that separates it from the scene. Usually this is to communicate that the character is not directly in front of the camera; perhaps they are talking over the phone, or from behind the point of view character, or the background is not suitable for a regular full-body sprite (such as the inside of a car) so the cut-in is used so the player can still see the character’s expressions.
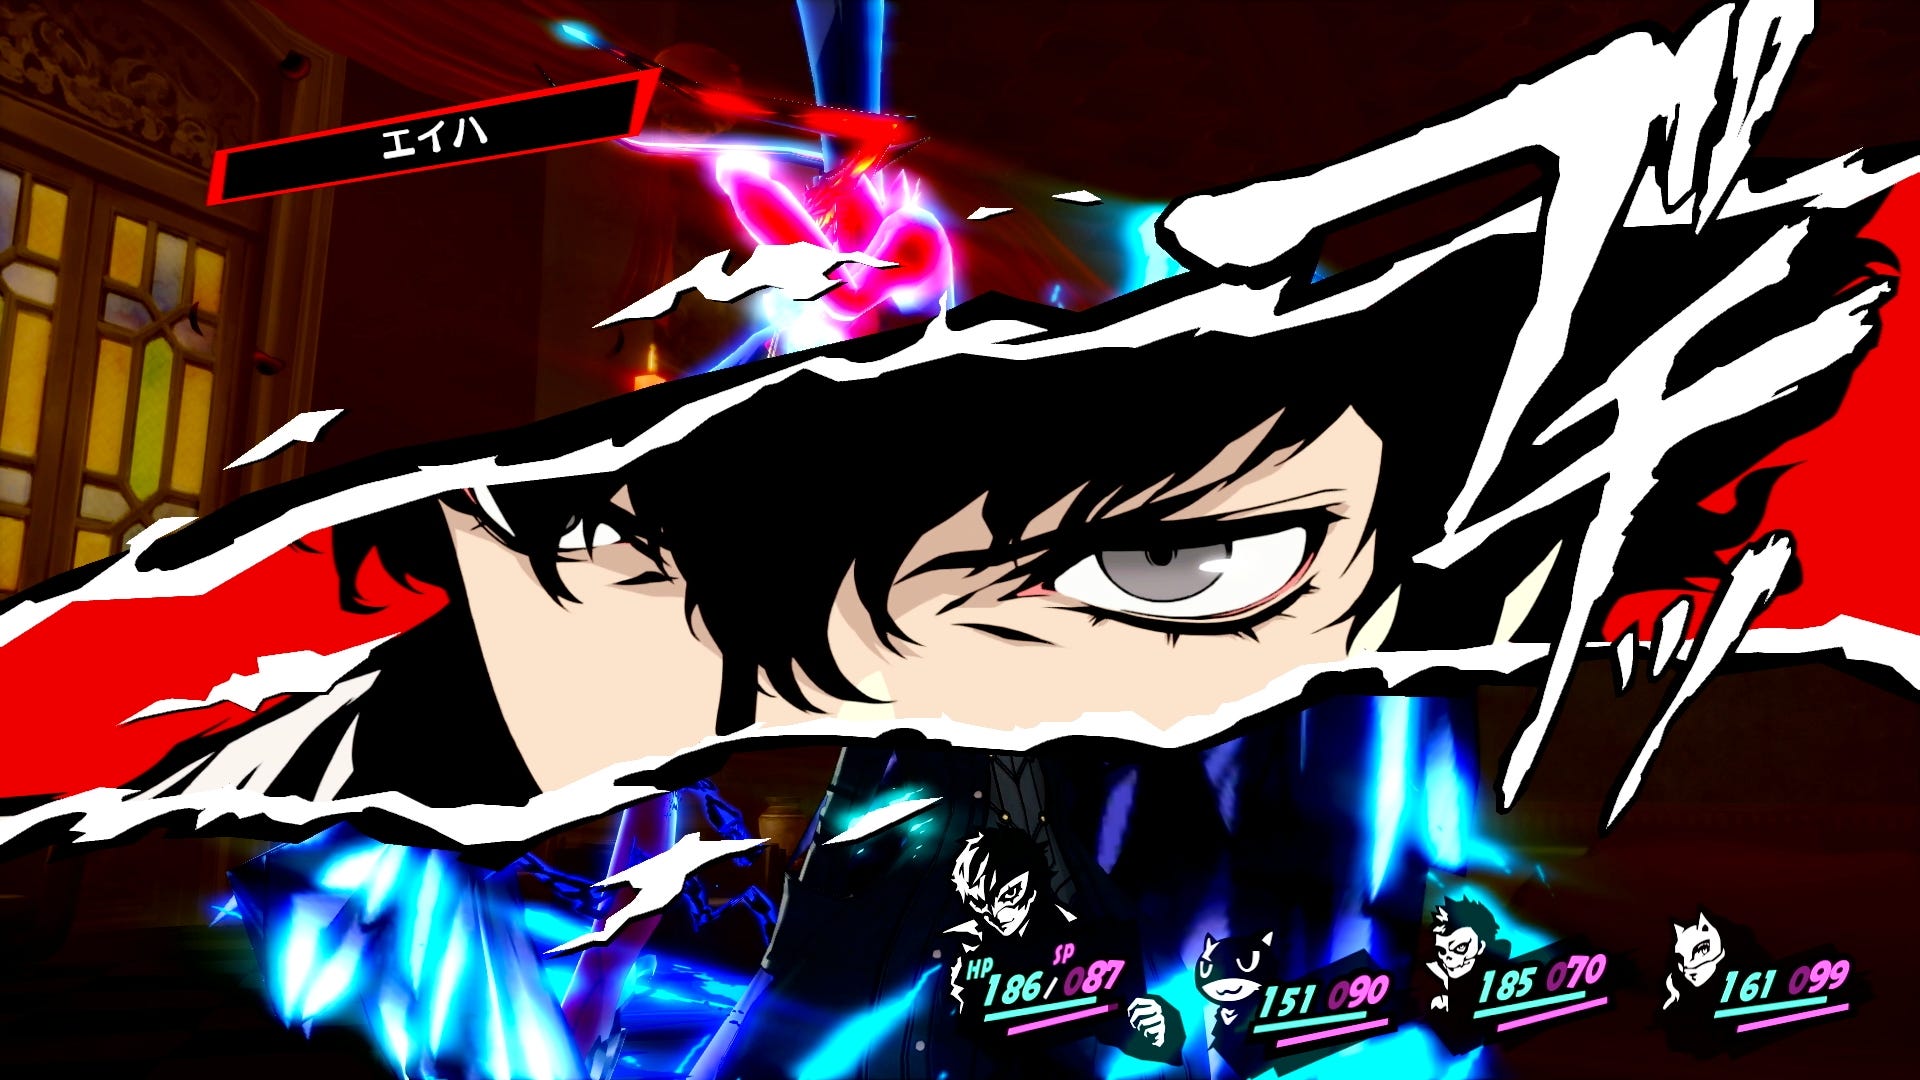
It can also be used for moments of drama – think of the cut-ins during Ace Attorney’s cross-examinations, or the animated cut-ins during battles in Persona 5.
Rather than having to show these foreground and background images separately, LayeredImageMask will let you add them right as part of the final image, so they’re all shown at once. Let’s look at simple example to start.
Simple Example
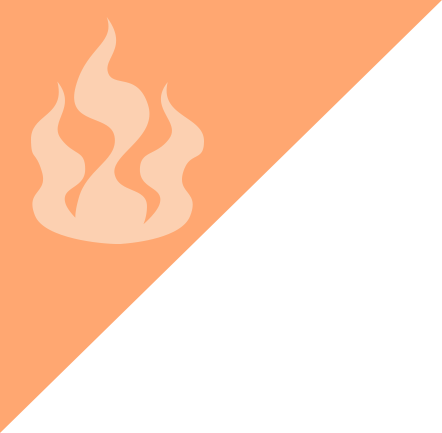
First, here is our sprite image (Feniks), our mask image (a filled-in triangle) and a background and a foreground (also triangles – one is translucent and the other is an outline with no fill).
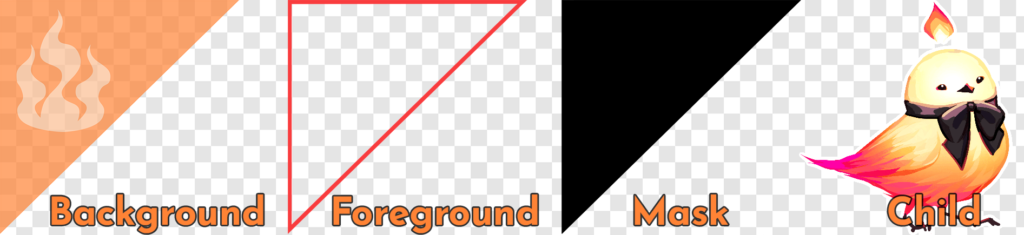
The end goal is to sandwich these all together to get this:
If we look at it from the side, you can see the foreground and background layers better:

The process for masking the initial image into that triangle shape is similar, but this time the child image (Feniks) has transparency. What does that mean for the final masked image?
If the child image is transparent, then the final masked image will also be transparent in the same places. So you can see that the bottom part of Feniks is now masked to the triangle shape, but you don’t “see” the triangle mask anywhere on the final image. The mask is only used as a template to cut away the child image into the same shape as the mask – if there’s nothing to cut away, it just remains transparent in the final masked image too.
So here’s a step-by-step of how the masking works and puts the background and foreground layers together to get the final image:
Also note that the mask image, foreground image, and background image are all the same size so they position properly on top of one another. In this case, that size is 442×433 pixels. Similarly the child image is positioned and cropped so it’s the same size as the other images. The final code for the above image is:
image feniks corner = LayeredImageMask("feniks",
    Transform(crop=(117, 1, 442, 433)),
    background="triangle_bg.png",
    mask="triangle_mask.png",
    foreground="triangle_frame.png")
And here are the final images:


Elaborate Example
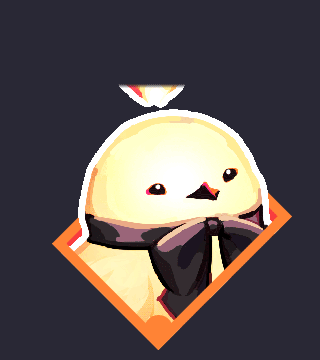
So this is all well and good, but what about the image that appears in the example screenshots for the Layered Image Masks tool – the one where the sprite appears to be coming “out of the frame”?
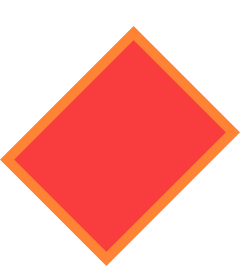
Well this is where we can get a bit fancy with layered image masks. Consider for example this screenshot from Fire Emblem: Three Houses:
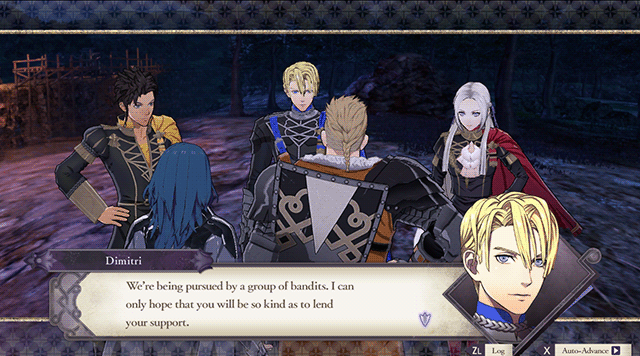
Here you can see that Dimitri is masked into a diamond shape at the bottom to fit into the UI element, but also isn’t restricted to the diamond shape at the top, either – his head goes up and above where the diamond shape’s top is.
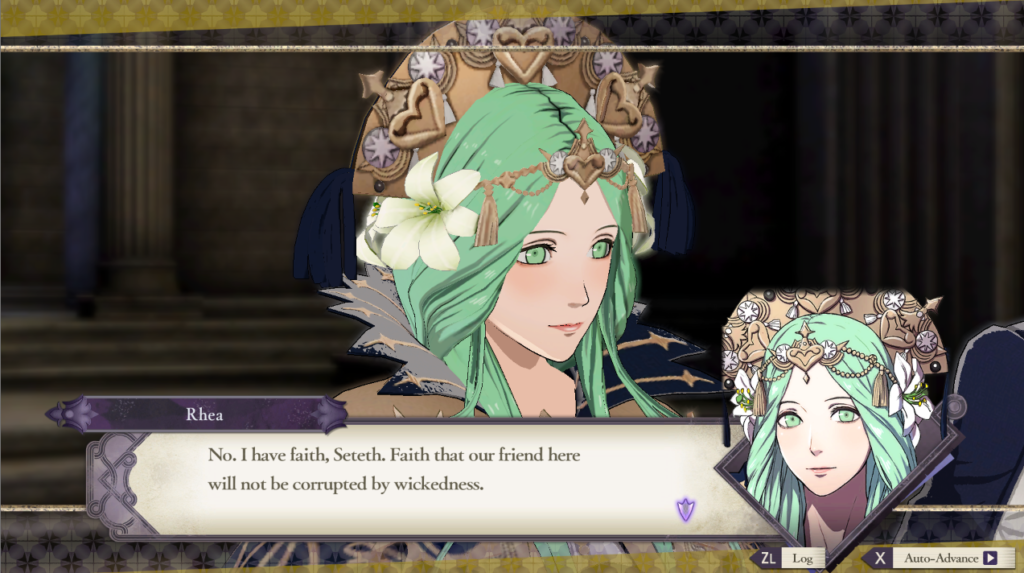
There is also an interesting thing that happens for characters with elaborate hair styles or headwear that would ordinarily take up a lot of screen space above the character’s face. Here’s another screenshot with the character Rhea, whose headpiece is cut off at the top. Rather than being straight cut off though, you can see that it “fades out” to the background. There’s a similar rule in place for characters whose sprite exceeds the width of the diamond. Notice how this character’s hair is cut in a straight line to the left and right of the diamond:

What kind of images would you need in order to create this sort of shape? Let’s explore that.
First, the background and foreground seem fairly straightforward. The former is just a diamond, and the latter is a frame. Except, we don’t want the frame to go in front of the sprite at the top half of the diamond, so it should actually only cover the bottom half of the diamond.
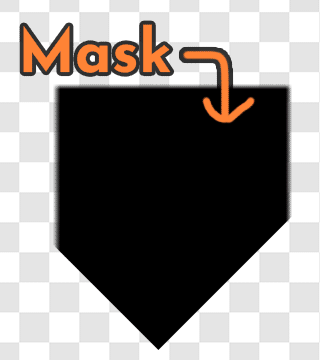
Now what about the mask? Well, if you’ve been following along, you’ll know that anywhere on the mask that’s opaque is where the child image can be opaque too, and any transparency on the mask gets cut away from the child image. So your first instinct is probably to make it the same shape as the background, like a diamond:
This is pretty close! But when I put my image into it, it gets cut off in the diamond shape instead of expanding up past it like in the screenshots. So then, how about making the mask look more like a rectangle with a triangle on the bottom?

This is getting very close! The last bit of polish is to get that “fadeout” effect seen on sprites that exceed the maximum height or width. For that, you’ll add a slight transparency gradient to the outer edges of the mask. It’ll look like this:
And now, assuming all our background and foreground images have been adjusted to be the same size as the mask, and the sprite image is cropped correctly, all the pieces come together to give us this:
Which looks really neat, like they’re “popping out” of the frame. We can move Feniks around so you can see how the fadeout works around the edges:
And here are the final mask, foreground, and background images:


An important thing to note is that even though the foreground and background are shorter than the mask, they should still be saved at the same dimensions as the mask. You need to be able to line all three images up (the mask, the background, and the foreground) without moving them to get the properly positioned final image. This is why the child image is cropped as well, so in the end, all four images are the exact same dimensions.
Cropping and Zooming Masks
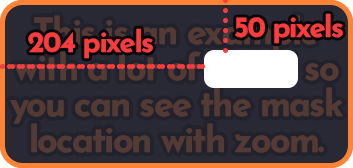
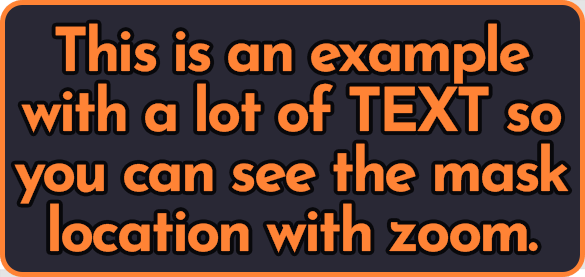
In some situations, your child image may be much larger than you need it to be to fit the mask properly, and you’d like to shrink it down before masking it. Consider the following child image, which is 585×277 pixels:

Let’s say we want the final masked image to show the all-caps “TEXT”, but we also want this image to be about 60% of its full size, so the final image is 353×168. Our mask image looks like this and is 94×38:

You can see that this mask is a bit too small as-is to cover the “TEXT” in the child image, so we need to shrink the child image down by using the zoom property.
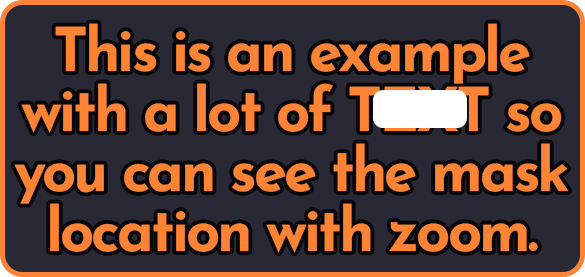
Typically, you can shrink an image with Transform("text_box.png", zoom=0.6) and this will make the text_box.png image 60% of its original size. This results in the following, smaller image, which now allows the mask to perfectly fit over the “TEXT” text.
Like usual, we will need to crop the child image to fit the final masked image. In this case, the mask is 94×38 as mentioned, and the desired position is at (204, 50):
So then the next logical step is to add the crop and the zoom to the AlphaMask…
image text_box_mask = AlphaMask(
    Transform("text_box.png", zoom=0.6, crop=(204, 50, 94, 38)),
    mask="box_mask.png"
)
This, however, has a rather odd result:

That certainly isn’t masking out the “TEXT” in the image. What happened here?
Well, if you scroll to the bottom of the List of Transform Properties in the Ren’Py documentation, you will see a list of what order the various transform properties are applied in. Notably, for our purposes, crop is applied BEFORE zoom is. So that means what just happened, in order, looks like this:
Clearly, this isn’t the result we wanted. So how do you fix this?
One way is to apply the zoom to the image elsewhere, and then crop it. For example:
image text_box_smaller = Transform("text_box.png", zoom=0.6)
image text_box_mask = AlphaMask(
    Transform("text_box_smaller", crop=(204, 50, 94, 38)),
    mask="box_mask.png"
)
This handily solves the issue for regular alpha masks, and you can do something similar for LayeredImageMask:
image text_box_smaller = LayeredImageProxy("text_box", Transform(zoom=0.6))
image text_box_mask = LayeredImageMask("text_box_smaller",
    Transform(crop=(204, 50, 94, 38),
    mask="box_mask.png"
)
But, if you’d like to avoid declaring “intermediary” images, you can also do some math to get the right final numbers:
image text_box_mask = AlphaMask(
Transform("text_box.png", zoom=0.6,
crop=(int(204/0.6), int(50/0.6), int(94/0.6), int(38/0.6))),
mask="box_mask.png"
)
## OR
image text_box_mask = LayeredImageMask("text_box",
Transform(zoom=0.6, crop=(int(204/0.6), int(50/0.6), int(94/0.6), int(38/0.6))),
mask="box_mask.png"
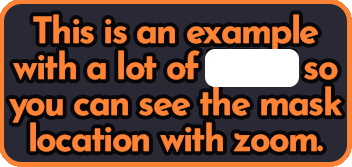
)And tada, the final image!

How does this work, exactly? You might have noticed all the crop numbers are divided by the zoom factor, that is, 0.6. int(number) is used to ensure the final result is an integer – Ren’Py treats integers as pixel values, and floats as a percent of the image size, so we have to be sure to convert back into an integer after dividing by 0.6.
Since the initial (204, 50, 94, 38) numbers were picked out of the child image when it was 60% of its original size, we then need to divide them by 0.6 to get those numbers relative to the child image when it’s 100% of its original size (since 94 = original_x*0.6, then 94/0.6 = original_x). Since the crop happens first, this ensures that the cropped image has the focal point we want. This means the cropped image will be approximately 157×63 pixels instead of the size of the mask, which is 94×38.
Then, due to the order transform properties are applied, the zoom is applied after the crop. This brings the cropped dimensions down to 94×38, which is the size of the mask. The mask can then be applied to get the final image like usual.
Other Transform Properties
Besides zoom and crop, covered in this tutorial, you can apply a number of other transform properties inside the Transform provided either to LayeredImageMask or wrapping the child image of a regular AlphaMask. Notably, sizing properties (such as xysize) will behave similar to zoom in that it is applied before a crop. In particular, the most useful property will probably be matrixcolor, which allows you to alter the colours of the final image. There are no particular “gotchas” to this – simply add the desired property e.g.
image feniks masked sunset = LayeredImageMask("feniks",
    Transform(crop=(200, 20, 150, 150), matrixcolor=TintMatrix("#ddc5b7")),
    mask="rounded_rectangle.png"
)
## OR
image feniks masked sunset = AlphaMask(
    Transform("feniks.png", crop=(200, 20, 150, 150), matrixcolor=TintMatrix("#ddc5b7")),
    mask="rounded_rectangle.png"
)
Summary
- To mask an image, you need a mask image (which is the shape of the final image) and a child image (which is the “design”/visible part of the final image, in the shape of the mask)
- AlphaMask can be used for regular images. If you want to mask layered images, you must use LayeredImageMask, a tool found on my itch.io
- Besides a mask and child image, LayeredImageMask also takes an optional transform (which you can use for cropping, zooming, and other transform properties) and optional background and foreground properties. These can be used to provide UI elements behind and in front of the final image respectively
- The final masked image is the same size as the child image. In order to make it the size of the mask so it doesn’t have invisible space around it, you must use
cropto crop the child image to be the same size as the mask - If you need to also zoom the child image out or in, the crop is applied before the zoom is, so you may need to divide your crop numbers by the zoom value to get the correct final mask area
Conclusion
I hope this helped you understand what images you’ll need to properly mask your layered images into the shapes and sizes you want. If you’re looking for more of a challenge, consider making your image mask animated using ATL.
Keep an eye out on this website for more tutorials, and on my itch.io for more tool releases!