If you followed along with the previous tutorials on conditional statements and comparisons, you should be well-equipped now to apply that knowledge to choice menus in Ren’Py. In this tutorial, you’ll learn how to hide choices from players if they don’t fulfill certain conditions.

This tutorial expect you to be familiar with writing basic choice menus. If you need a quick refresher, you can check out Menus, Labels, and Jumps in the Ren’Py quickstart. You should also be familiar with writing conditional statements – you can find more on that in Conditional Statements in Ren’Py.
Conditional statements are all about controlling the flow of gameplay so that the game can react to the player’s choices. Sometimes you may want to do things like:
- Allow a player to choose to reference a past event, but only if that past event actually occurred
- Hide choice options from players if they haven’t gained enough trust or affection points with a particular character
- Only allow players to make choices that align with their character’s stats (e.g. a stealthy character doesn’t have the option to brute-force entry by breaking down the door)
- Prevent a player from choosing a choice more than once.
- For example, when asking a character for information, they should only be able to ask each question once
How to add a conditional statement to a choice
The first thing you need to know about adding conditionals onto menu options is that it comes after the choice text but before the final colon. Let’s look at a choice menu now.
Example 1
For this example, I’m using an excerpt from the upcoming Made Marion game by Velvet Cupcake Games. Special thanks to Becky for letting me feature their code!
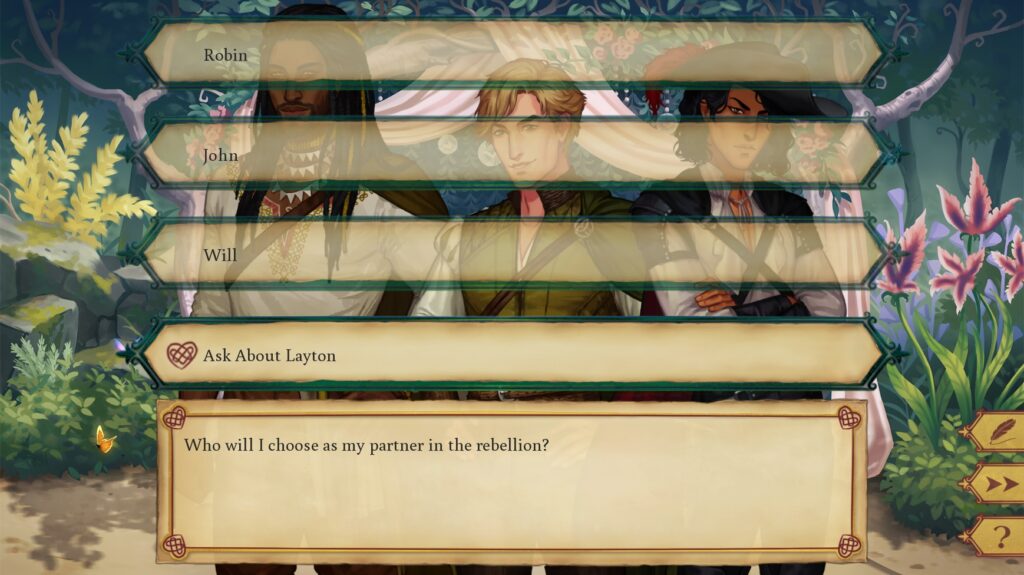
At the end of the Sherwood common route in the game, the player gets a choice of who to choose as their partner in the rebellion, which begins a romance route with their chosen character. There are three main love interests on the Sherwood common route: Robin, John, and Will. A fourth character, Layton Tuck, cannot be romanced in the main game, but the player has the opportunity earlier in the Sherwood common route to meet Layton and possibly kiss him. The variable tuck_status tracks the player’s interactions with Layton – "nodance" if the player doesn’t meet him in Chapter 1 (the default), "escaped" if the player met Layton but didn’t run off into the woods with him, and "snogged" if they kissed Layton.
For this choice menu, the player can only ask if Layton can be their partner if they kissed him earlier in the game. Let’s see what that looks like below:
default tuck_status = "nodance"
label choose_route():
    menu:
        "Who will I choose as my partner in the rebellion?"

        "Robin":
            jump robin_route
        "John":
            jump john_route
        "Will":
            jump will_route
        "Ask About Layton" if tuck_status == "snogged":
            jump layton_aside
This looks like a pretty standard choice menu – the only thing of note is on line 12: "Ask About Layton" if tuck_status == "snogged":. This is how you add conditional logic to a choice menu option. This choice will only appear in the choice menu if tuck_status == "snogged" evaluates to True. If the player did not kiss Layton – that is, tuck_status = "nodance" or tuck_status = "escaped" in this case – they will not see this choice at all, and will only see the options “Robin”, “John”, and “Will”.
Note that there is no such thing as elif or else for menu choices. If you would like a choice to be available only if some previous conditions in the choice menu are not True, you will have to add those checks into your conditional statement e.g. "Choice" if ate_apple: and "Choice 2" if not ate_apple: rather than using an if/else structure.
You can follow Made Marion’s development here and wishlist the game on Steam!
Example 2
Though the previous example’s expression is quite short (it just checks a string value), the check can be as complex as you want it to be. If you recall from the tutorial on combining comparisons, there was a conditional statement from Mass Effect 3 to see if Shepard had fulfilled the conditions to get the best outcome for one of the missions. The check looked like this:
if (reputation >= 4 and quarian_trust >= 5
        and tali_on_ship and legion_on_ship
        and geth_fighter_squadrons):
    "Convince the quarian fleet to cease fire."
Let’s turn that into an actual menu now:
menu:
    "Allow Legion to finish uploading the code.":
        "Shepard" "Upload the code to the geth."
        "Shepard" "Tali, call off the fleet if you can."

    "Let the geth die.":
        "Shepard" "No, I can't risk the quarian fleet."
        "Shepard" "Not to save the geth."

    "Convince the quarian fleet to cease fire." if (
            reputation >= 4 and quarian_trust >= 5
            and tali_on_ship and legion_on_ship
            and geth_fighter_squadrons):
        "Shepard" "No. Nobody else dies today. Legion, keep going."
        "Shepard" "All ships, this is Commander Shepard."
        "Shepard" "The Reaper is dead. Stand down."
Like in the original tutorial with this conditional statement, I’ve used parentheses to split this long expression up onto multiple lines for improved readability. Again, the conditional statement can have as many operands and operators as you need to complete the check, just like for regular conditional statements. The only difference is that it comes after the text of the choice option.
Example 3
The use case list above included “Hide choice options from players if they haven’t gained enough trust or affection points with a particular character”. Let’s look at an example of that.
default ashwin_trust_points = 0
default xia_trust_points = 0
default zoran_trust_points = 0
default quest_companion = ""

label faerie_court():

    "Faerie Queen" "Is there anyone you wish to have accompany you?"

    menu:
        "I want Ashwin to come with me." if ashwin_trust_points >= 5:
            $ quest_companion = "Ashwin"

        "I want Xia to come with me." if xia_trust_points >= 5:
            $ quest_companion = "Xia"

        "I want Zoran to come with me." if zoran_trust_points >= 5:
            $ quest_companion = "Zoran"

        "No, I'll go on my own.":
            $ quest_companion = ""

    "Faerie Queen" "Very well."
    if quest_companion:
        "The Faerie Queen snapped her delicate fingers together, the sound echoing unusually loudly around the room."
        "Suddenly, [quest_companion] was standing in front of you, looking dazed."
Here, the player can only bring along a quest companion if they have 5 or more trust points with them. (Presumably, throughout the game you have been adding points to these variables as needed). They may choose to go alone even if they do have enough trust points to bring someone, though if they don’t have enough trust points with anyone, that will be their only option.
Displaying disabled choices
By default, Ren’Py will simply not show choices that the player doesn’t fulfill the conditions for. For example, if the player does not have sufficient trust points with any of the three characters from Example 3, the menu will only have one option, “No, I’ll go on my own”.
If you’d like the player to be able to see these options but be unable to click on them, there’s a special configuration variable called config.menu_include_disabled (link to Ren’Py documentation). By default, this value is False, which means choices are hidden if they can’t be chosen. If you add the following line to your project:
define config.menu_include_disabled = Truethen it will instead show the choices, but the player will be unable to click them. This line of code can go in any .rpy file; I suggest options.rpy as it’s where a lot of other configuration variables are set up.
You can then style the insensitive properties of the choice button to change how disabled choices are displayed in the menu. In particular, you can modify this line in gui.rpy:
define gui.choice_button_text_insensitive_color = "#444444"This will change the colour of the text on an insensitive choice button.
You can also add a new image in gui/button/ called choice_insensitive_background.png, which will be used as the background of any choices which are disabled. It should generally be the same size as existing choice button backgrounds to avoid visual issues (unless you’re comfortable adjusting screen styles, but that’s out of the scope of this tutorial).
Important Notes
If you make menus with conditions on the choices, if no choices are available to the player, the menu will be skipped altogether.
What does this mean? As usual, let’s look at an example:
default strength = 0
default dexterity = 0
default intelligence = 0

label locked_door():

    "You come across a locked door."
    menu:
        "Try to find the owner's spare key." if intelligence >= 5:
            "As expected, you found the key quickly in the potted plant by the door."
            jump explore_house
        "Pick the lock." if dexterity >= 5:
            "You swiftly procured a lock pick and got to work on the door."
            "It opened moments later."
            jump explore_house
        "Knock the door down." if strength >= 5:
            "A door like this was no match for your steel-toed boots."
            "It sure made a racket, though."
            jump explore_house

    return
Here is a familiar scenario: the player comes across a locked door, with three options for dealing with it based on their points in strength, intelligence, and dexterity. They can only open the door with a particular method if their stats meet the minimum requirement of 5 points. The game script proceeds in the label explore_house after the player has bypassed the locked door.
The issue here is that the player may not meet any of the minimum stat requirements for any of these choices to appear. If a player comes to this choice menu with 3 intelligence, 4 strength, and 1 dexterity, all of the choices should be insensitive (disabled).
What does Ren’Py do if the player reaches a menu where all the choices are unavailable to the player? It simply skips past it. In the example above, the game will display “You come across a locked door” from line 7, and then skip over the menu, arrive at the return statement on line 21, and just end. The player wouldn’t see the menu at all, because none of the choices are available. Ren’Py will skip the menu regardless of whether config.menu_include_disabled is set to True or not.
Therefore, if all of your menu choices have conditions, you must either:
- Make sure the player has at least one guaranteed option available to them, or
- Account for the fact that the menu may be completely skipped and adjust the code after the menu accordingly.
In the example above, perhaps instead of a return statement on line 21, there could be a jump to a bad ending label e.g. jump could_not_unlock_door. Then, if the player encounters the locked door without the required skills, they get a proper ending instead of being dropped unceremoniously into the main menu.
Summary
- Conditional statements in choice menus go at the end of the choice text, before the final colon. The conditions themselves are written exactly like they are in regular scripting otherwise.
- There is no such thing as an
eliforelsefor a choice, onlyif. - By default, Ren’Py does not show disabled choices to the player. You can show disabled choices by enabling
config.menu_include_disabled. - If the player doesn’t meet the conditions for any of the choices in a menu to appear, the menu is completely skipped.
Next Steps
That’s everything for this tutorial! Hopefully these examples gave you a better idea of when and how to use conditionals in choice menus in Ren’Py. While I don’t yet have tutorials on styles, there are links in Resources which go over some of the basics that you can use to style insensitive choices. You may also be interested in the upcoming tutorial on menu sets, which allows you to remove choices from a choice menu after the player has chosen them. The tutorial on menu sets should be posted soon! If there’s a topic you really want to see, feel free to leave a comment below letting me know. And, if you’re feeling generous, consider tipping me on Ko-fi.